Every once in a while I happen to find myself in a public network, where all access besides HTTP and HTTPS is blocked by the firewall. This is extremely inconvenient, as I routinely need to access SSH, VPN or other ports besides HTTP(S). Over time I have developed a reasonably fast and simple way of overcoming the restriction whenever I need it. Let me document it here.
Google Cloud Shell
There are probably hundreds of cloud providers nowadays, each of them trying to outcompete the others by offering better, cheaper, faster, or more diverse set of services. One killer feature of the Google Cloud platform is its cloud shell, which gives you command-line access to a tiny Linux virtual machine directly from their webpage for free:

Once you are logged into Google Cloud platform you may open the shell window via this button
Even if you do not have any serious use for a cloud provider, the cloud shell is one good reason to get an account at the Google Cloud platform. Because whenever I find myself locked out of SSH behind a paranoid firewall, I can still SSH into any of my servers via the cloud shell. This works even when your access is limited to an HTTP proxy server.
Once upon a time there was a great service named koding.com, which also provided free access to a Linux console via HTTP. Unfortunately, they have changed their pricing model since then and do not seem to have any similar free offerings anymore. If you know any alternative services that offer a web-based shell access to a Linux VM for free, do post them in the comments.
OpenVPN via HTTPS
Sometimes SSH access offered by the cloud shell is not enough. For example, I would often need to access the company's VPN server. It runs on port 1194 and in a properly paranoid network this port is, of course, also blocked. The way to sneak through this restriction is the following.
- Launch a server in the cloud, running an OpenVPN service on port 443 (which corresponds to HTTPS). Even the most paranoid firewalls would typically let HTTPS traffic through, because otherwise they would block most of the web for their users.
- Connect to that VPN server and tunnel all traffic through it to the outside world.
- Now we are free to connect anywhere we please. In particular, we may open a VPN tunnel to the company's server from within that "outer" VPN tunnel.
- At this point I would sometimes SSH into a machine behind the company's VPN and never cease to be amused by the concept of having a SSH tunnel within a VPN tunnel within another VPN tunnel.
Let us now go through all these steps in detail.
Setting up an OpenVPN server
We start by launching a machine in the cloud. You are free to choose any cloud provider here, but as we are using Google's cloud shell already anyway (we are working behind a paranoid firewall already, remember), it makes sense to launch the server from Google's cloud as well. This can be as simple as copy-pasting the following command into the same cloud shell prompt:
gcloud compute instances create openvpn-server --zone=europe-west3-a --machine-type=f1-micro --tags=https-server --image=ubuntu-1604-xenial-v20180405 --image-project=ubuntu-os-cloud --boot-disk-size=10GB --boot-disk-type=pd-standard --boot-disk-device-name=openvpn-server
(obviously, detailed documentation of Google cloud functionality is way beyond the scope of this blog post. All the necessary references and tutorials are rather easy to find, though). You may play with some of the settings passed to the command above, however the choice of the ubuntu-1604-*** image is important, because the script from the next part was only ever tested on that Linux version. The chosen machine type (f1-micro) is the cheapest and should cost around 5 euros per month (if you keep it open constantly), or a matter of cents, if you only use it for some hours.
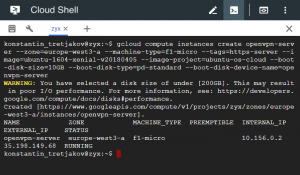
Launching a machine in the cloud
Once the machine is up, we SSH into it by typing:
gcloud compute ssh openvpn-server
Here we'll need to install and configure the OpenVPN server. This may be a fairly lengthy process of following step-by-step instructions from, for example, this well-written tutorial. Luckily, I've gone through this already and wrote down all the steps down into a replayable script, which seems to work fine so far with the chosen Linux image. Of course, there's no guarantee it will continue working forever (some rather loose configuration editing is hard-coded there). However, as we have just launched a throwaway virtual server, the worst that can happen is the need to throw that server away if it breaks. (Do not run the script blindly on a machine you care about, though). So let's just download and run it:
curl -s https://gist.githubusercontent.com/konstantint/08ab09202b68e4e3542622e99d21a82e/raw/1a3ee68008d5b565565ebb8c126ae68a8cebe549/ovpn_setup.sh | bash -s
Once completed, the script prints the filename "/home/<username>/client-configs/files/client1.ovpn". This is the name of the file which we need to transfer back to our computer. A clumsy, yet fast and straightforward way is to simply copy-paste its contents from the shell into a local text file:
cat /home/your_username/client-configs/files/client1.ovpn
We then select all the output starting from the first lines of the file
client
dev tun
proto tcp
...
all the way down to
...
-----END OpenVPN Static key V1-----
</tls-auth>
(holding "shift", scrolling and clicking the mouse helps).
We then create a new file (on the local machine), name it client1.ovpn (for example), paste the copied text and save. That's it, we have successfully set up an OpenVPN server running on port 443. Type exit in the cloud shell to log out of the server as we don't need to configure anything there.
Setting up an OpenVPN client
Next we must set up an OpenVPN client on the local computer. I am using a Windows laptop, hence the instructions are Windows-specific, although the logic for Linux or Mac should be rather similar. First, install OpenVPN. The nicest way to do it in Windows is via Chocolatey. Open cmd.exe with administrative privileges and:
1. Install Chocolatey, if you still don't have it (trust me, it's a good piece of software to have):
@"%SystemRoot%\System32\WindowsPowerShell\v1.0\powershell.exe" -NoProfile -InputFormat None -ExecutionPolicy Bypass -Command "iex ((New-Object System.Net.WebClient).DownloadString('https://chocolatey.org/install.ps1'))" && SET "PATH=%PATH%;%ALLUSERSPROFILE%\chocolatey\bin"
2. Now install OpenVPN (if you still don't have it):
choco install -y openvpn
3. Launch OpenVPN GUI (Windows button + type "OpenV" + Enter), right-click on the newly appeared tray icon, select "Import File..." and choose the client1.ovpn file we created:
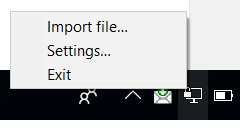
Import OVPN file
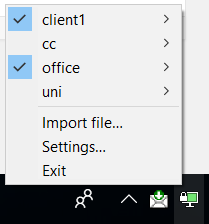
4. Once you've done it, the OpenVPN tray menu will offer you a "Connect" option (or a "client1" submenu with a "Connect" option if you have other connections configured already). Click it, observe the connection dialog, wait until the tray icon becomes green, and congratulations, all your traffic is now tunneled through port 443 of the cloud machine you launched some minutes ago.

Connected
You may verify the effect by googling the words "my ip". You are now also free to connect to any ports or services you need.
Tunnel in a Tunnel
As I mentioned in the beginning, having freed myself from the firewalls of a paranoid network administrator, I would then sometimes need to connect to a corporate or a university VPN. This happens to be surprisingly easy (this part is, however, Windows specific - I am not sure how an equivalent action should look like on Linux or Mac, although I'm sure it should be possible).
- OpenVPN uses a virtual network tunnel adapter to forward traffic. Initially it only installs one such adapter, but if you want to run a tunnel within a tunnel you will need to add a second one. This is done by simply running
C:\Program Files\TAP-Windows\bin\addtap.batwith administrator privileges. It only needs to be done once, of course (unless you need to run a tunnel within a tunnel within a tunnel - then you need to add a a third TAP adapter by runningaddtap.batagain). - Now running a VPN within a VPN is simply a matter of asking OpenVPN to "Connect" to VPNs in the appropriate order. As we are already connected to
client1, we simply connect to another profile without disconnecting the first one - this will happily forward a tunnel through an existing tunnel. Fun, right?
VPN via VPN
Cleaning Up
If you only needed the VPN temporarily, do not forget to destroy the cloud machine before going home - otherwise you'll have to pay the unnecessary costs of keeping a server up. Destroying servers is simple. Just go back to the cloud shell where we launched the server and run:
gcloud compute instances delete openvpn-server
That's it. You are back at the mercy of the firewalls.