I had to replace my SIM card today. The old one was mini-sized and I needed a micro-sized one. My previous SIM card stayed with me for about 20 years or so. I have gone through high school, university, and traveled around to countless places with it. I changed my phone several times, starting from an older, bulkier Nokia through several candy-bar Nokias and a couple of smartphones. My personal computer evolved from a 200MHz Pentium with 16MB RAM to a 2.8GHz quad-core with 32GB RAM. But my SIM card always stayed the same. Let me dedicate this post to the memory of this glorious tiny computer - the most long-lasting and reliable piece of computing equipment I have ever used.

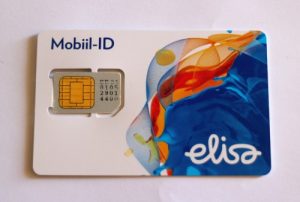
My retiring SIM card. The mobile operator changed its name from Radiolinja to Elisa in 2000, but the SIM card did not care.
What is a SIM card?
Your SIM card is just another smart card, technologically similar to any of the "chip-and-pin" bank cards in your wallet, your ID card and even your contactless public transport tickets (which communicate using the same set of protocols, just wirelessly). Note, however, that banks started to switch from magnetic to "chip-and-pin" credit cards and countries began issuing smart-card-based identity documents only about 15 years ago or so. SIM cards, on the other hand, had been in wide use much earlier, long before the term "smart card" became a popularized buzzword.
All smart cards are built to serve one primary purpose - identification. The card stores a secret key (which is impossible to retrieve without disassembling the card using ultra-high-tech lab equipment), and provides a way to execute the following challenge-response protocol: you send a random string (a challenge) to the card. The card encrypts the string using the stored key and returns the response. The correctness of this response can now be verified by a second party (e.g. the mobile operator, the bank or a website using ID-card authentication). The actual details of the computation differ among the various smart cards. For example, some use symmetric while other - asymmetric cryptography. Some cards provide additional services, such as creating digital signatures or storing information on the card. None the less, identification is always the core function. This explains the name of the SIM card: Subscriber Identity Module. It is a module, which identifies you (the subscriber) to the network provider.
What is inside a SIM card?
The best way to understand what is inside a SIM (or any other type of smart-) card is to connect it to your computer and "talk" to it. Many laptops have integrated smart-card readers nowadays, so if you find a suitable frame for your nano/micro/mini-SIM, you may simply put it into the reader just as you would do with an ID or a bank card.
Old mini-SIM in a frame from a newer card
Note, though, that if your frame is flimsy and not fitting perfectly (as is mine on the photo above) you run the risk of losing the chip somewhere in the depths of the card reader slot before you even manage to slide it in completely. Hence, in my case, a tiny cross-style USB card reader was a more convenient and reliable option:
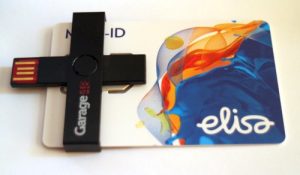
SIM in a frame in a reader
Plug it in, wait until the system recognizes the device, and we are ready to talk. There are many tools for "talking" to the card on a low level, but one of the best for the purposes of educational exploration is, in my opinion, the program called CardPeek. Let us fire it up. At start up it asks for the card reader to use (note that you can use it to explore both contact and contactless cards, if you have the necessary reader):
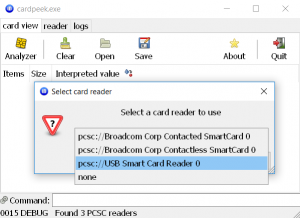
Select reader screen
We can now click "Analyzer → GSM SIM", provide the PIN, wait a bit, and have the program extract a wealth of information stored on the card:
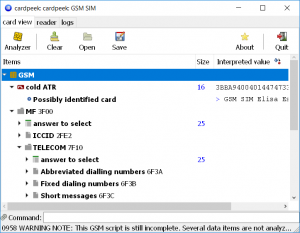
SIM card analyzed
Fun, right? Let us now see where all this data came from and what it actually means.
How does it work?
At the hardware level, a smart card has a very simple connector with six active pins, which are designed for sending and receiving data to and from the card:

Smart card connectors (source)
Four pins (VCC, GND, CLK, I/O) are used for the basic half-duplex synchronous serial communication. RST is the reset pin, and VPP is used for supplying the higher voltage when (re)programming the card. When you first connect to the card, the protocol requires to zero the "reset" pin, to which the card will reply by sending a fixed sequence of bytes, identifying the card and its capabilities. It is known as the card's ATR ("Answer To Reset") string. You can see this string listed as the "cold ATR" entry in the screenshot named "SIM card analyzed" above.
Besides providing pre-packaged analysis scripts for various kinds of smart cards, CardPeek allows to send custom commands to the card by using its Lua scripting interface directly. This is what the "Command" text input at the bottom of the screen is for. Let us now switch to the "logs" tab and try sending some commands. First of all, we need to establish the connection to the card. This is done via the card.connect() call:
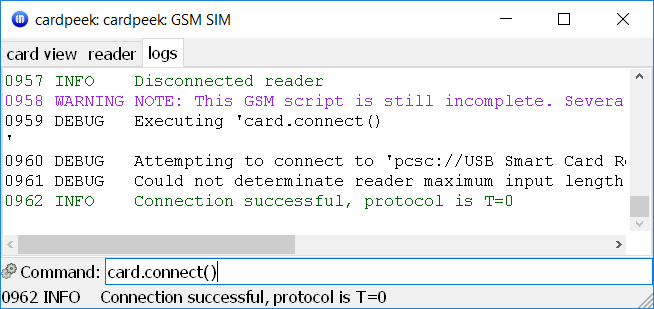
card.connect() example
The ATR string is received by the reader when the connection is first established. We can obtain it via card.last_atr() and print out to the log window in hex-encoded form using log.print and bytes:format (the documentation for all these APIs is available here):
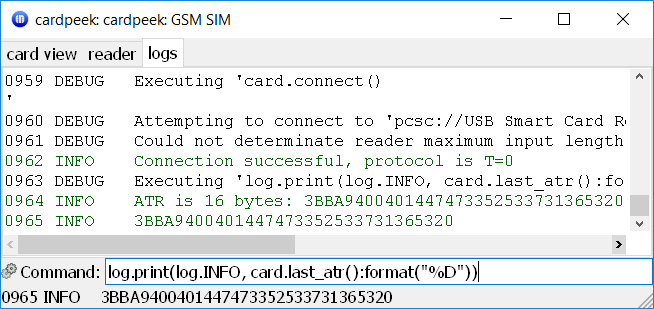
ATR example
As we see, the ATR for my card happens to be 3BBA9400401447473352533731365320 (in hex). If you search the web, you will find that this particular ATR is known to be a signature of the Elisa SIM cards. It is not a random string, though, and every byte has a meaning. In particular:
3Bis the "initial byte", and this particular value identifies the smart card as a SIM card.BAis the "format" byte. Its first four bits (1011) tell us that we have to expect fields TA1, TB1 and TD1 to follow. The last four bits denote the number 10 - the number of "historical bytes" at the end of the ATR.94is the field TA1, specifying the clock rate of the serial protocol00is the field TB1, specifying the programming voltage (apparently, the card is not re-programmable)40tells us that we have to read out another byte field TC2 (this is in the left-side part of the byte,4) and that the card uses T=0 protocol (this is in the right-side part,0).14is the promised TC2 field (not sure what it is meant for),- the last 10 bytes are the "historical bytes", providing card manufacturer-specific information.
Greeting your Card
Now that we are connected, we can send various commands to the card. Let us proceed by example. The first command we might want to send is "VERIFY CHV", which is essentially greeting the card by providing our PIN1 code ("CHV" stands for "Card Holder Verification").
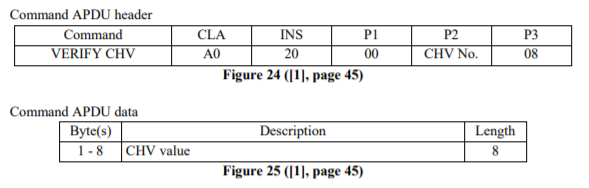
VERIFY CHV (source)
Every smart card command starts with a two-byte identifier (for example, A0 20 is the (hex) identifier of the VERIFY CHV command). It is followed by two parameter bytes P1 and P2. For example, the parameter P1 for VERIFY CHV is always 0, and P2 must indicate the number of the PIN we are submitting (i.e. 1 for PIN1, 2 for PIN2). Next comes P3 - a byte, specifying the length of the data which follows. For VERIFY CHV the data is the provided PIN itself, and it is always 8 bytes long. If the PIN is shorter than 8 bytes, it must be padded by bytes FF. The PIN itself is encoded in plain ASCII (i.e. 1234 would be 31 32 33 34).
Now, supposing my PIN1 is, in fact "1234", I can authenticate myself to the card via CardPeek as follows:
sw, resp = card.send(bytes.new(8, "A0 20 00 01 08 31 32 33 34 FF FF FF FF"))
Here, card.send is the sending command and bytes.new(8, ...) constructs an array of 8-bit bytes from a hex string (see CardPeek reference).
The sw and resp are the two components of the T=0 protocol response. For VERIFY CHV we only care that sw is equal to 9000, which means "OK". Note how this is printed in the log.

VERIFY CHV example
Beware that if you do not receive a 9000 response, it means that the card denied your PIN for some reason. Trying to submit a wrong PIN three times in a row will block the card.
Reading the Data
Now that we have identified ourselves to the card, let us try to read the data stored on it. The data on the card is organized in a hierarchy of files. It is this exact hierarchy that you can observe as the output of the "Analyzer" script. The root file is called "MF", it has the ICCID, TELECOM and GSM sub-files, which, in turn, have a number of predefined sub-files themselves, etc. The names are just conventions, the card itself uses two-byte identifiers for each file. For example, "MF" is actually 3F 00, "TELECOM" is 7F 10, etc. While the card is connected you can navigate around the file structure just like you would do in a normal operating system using the cd command, except that in smart-card lingo the corresponding command is called SELECT.
The binary form of the SELECT command is A0 A4 00 00 02 {x} {y}, where {x} {y} is the file identifier. Just like before, A0 A4 is the command code, 00 00 are the ignored P1 and P2 parameters, and 02 tells us that exactly two bytes must follow.
Consequently, if we wanted to select the file "MF (3f 00)/TELECOM (7F 10)/ADN (6F 3A)", which contains the address book records, we could achieve it by sending the following sequence of commands via CardPeek:
card.send(bytes.new(8, "A0 A4 00 00 02 3F 00"))
card.send(bytes.new(8, "A0 A4 00 00 02 7F 10"))
card.send(bytes.new(8, "A0 A4 00 00 02 6F 3A"))
Selecting files is a common task, and CardPeek provides a convenient shorthand: card.select("#7f10"). For some cards (not mine, unfortunately) it should also be possible to do things like card.select("/7f10/6f3a").
Once we have selected the ADN ("Abbreviated Dialing Numbers") file, we may read out the individual phone numbers from it using the READ RECORD command. The procedure is complicated by the fact that READ RECORD needs to be provided the "record size" as one of its parameters, which, in turn, must be taken from the response data of the last SELECT command, and this must be obtained via the GET RESPONSE command. The complete example would therefore be:
-- Select /TELECOM/ADN
card.select("#7F10")
sw, resp = card.select("#6F3A")
-- Read file metadata
GET_RESPONSE = "A0 C0 00 00"
sw, resp = card.send(bytes.new(8, GET_RESPONSE, bit.AND(sw, 0xff)))
-- Read out first record in the file
sw, resp = card.read_record('.', 1, resp:get(14))
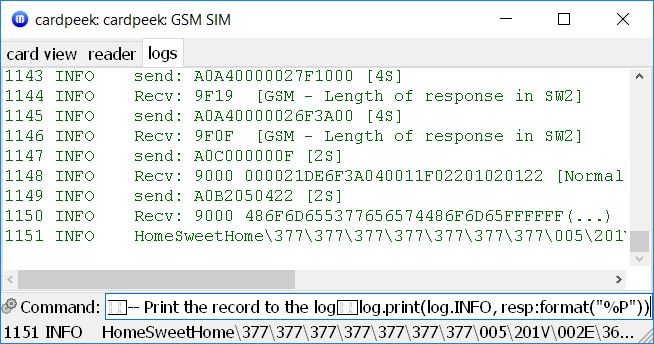
-- Print the record to the log
log.print(log.INFO, resp:format("%P"))
Reading out a phone record
Note that instead of printing the output to the log via log.print you could also show a message box:
ui.readline(resp:format("%P"))
or append a new node to the tree in the "card view" tab:
nodes.append(nodes.root(), {classname="block",
                            label="Name",
                            val=resp:format("%P"),
                            size=#resp})
In fact, at this point you should go and read the script $HOME/.cardpeek/scripts/gsm (beta).lua. It contains the code we ran in the beginning of this post to analyze the card. The script simply sends the relevant commands to the card and appends all responses as nodes to the tree.
Authentication
While data storage is a useful capability of a SIM card, its main purpose is subscriber authentication. Thus, our acquaintance with the SIM card would be incomplete without checking the corresponding function out as well. It is quite simple:

RUN GSM ALGORITHM (source)
That is, the process is the following: we send the byte sequence A0 88 00 00 10, followed by a 16 byte-long challenge string (which is normally given by the mobile operator when the phone joins the network). The SIM card responds with 12 bytes, of which the first 4 we should send back to the mobile operator for verification, and use the remaining 8 as a cipher key.
Before we can use the RUN GSM ALGORITHM command we need to verify our PIN1 (already done) and SELECT the GSM (7F 20) file:
RUN_GSM_ALGO = "A0 88 00 00 10"
GET_RESPONSE = "A0 C0 00 00"
DF_GSM = "#7F20"

CHALLENGE_STRING = "00 00 00 00 00 00 00 00 00 00 00 00 00 00 00 00"

-- Select GSM file
card.select(DF_GSM)

-- Send the challenge data
sw, resp = card.send(bytes.new(8, RUN_GSM_ALGO, CHALLENGE_STRING))

-- Read 12-byte-long response
sw, RESPONSE_STRING = card.send(bytes.new(8, GET_RESPONSE, 12))
log.print(log.INFO, RESPONSE_STRING:format("%D"))
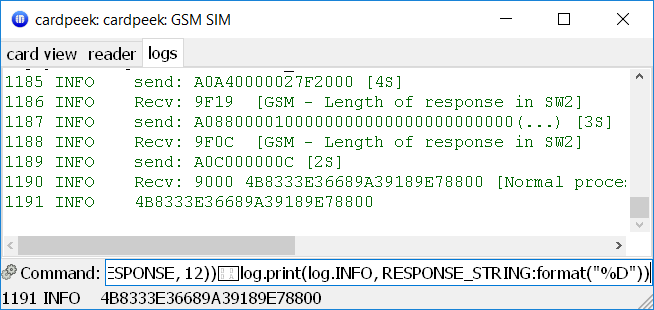
RUN GSM ALGORITHM example
And that is it. I hope you learned to understand and appreciate your SIM card a bit more today.