• Posted by Konstantin 28.06.2018 No Comments

    I had to replace my SIM card today. The old one was mini-sized and I needed a micro-sized one. My previous SIM card stayed with me for about 20 years or so. I have gone through high school, university, and traveled around to countless places with it. I changed my phone several times, starting from an older, bulkier Nokia through several candy-bar Nokias and a couple of smartphones. My personal computer evolved from a 200MHz Pentium with 16MB RAM to a 2.8GHz quad-core with 32GB RAM. But my SIM card always stayed the same. Let me dedicate this post to the memory of this glorious tiny computer - the most long-lasting and reliable piece of computing equipment I have ever used.
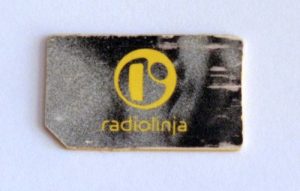
    My retiring SIM card. The mobile operator changed its name from Radiolinja to Elisa in 2000, but the SIM stayed.

    My retiring SIM card. The mobile operator changed its name from Radiolinja to Elisa in 2000, but the SIM card did not care.

    What is a SIM card?

    Your SIM card is just another smart card, technologically similar to any of the "chip-and-pin" bank cards in your wallet, your ID card and even your contactless public transport tickets (which communicate using the same set of protocols, just wirelessly). Note, however, that banks started to switch from magnetic to "chip-and-pin" credit cards and countries began issuing smart-card-based identity documents only about 15 years ago or so. SIM cards, on the other hand, had been in wide use much earlier, long before the term "smart card" became a popularized buzzword.

    All smart cards are built to serve one primary purpose - identification. The card stores a secret key (which is impossible to retrieve without disassembling the card using ultra-high-tech lab equipment), and provides a way to execute the following challenge-response protocol: you send a random string (a challenge) to the card. The card encrypts the string using the stored key and returns the response. The correctness of this response can now be verified by a second party (e.g. the mobile operator, the bank or a website using ID-card authentication). The actual details of the computation differ among the various smart cards. For example, some use symmetric while other - asymmetric cryptography. Some cards provide additional services, such as creating digital signatures or storing information on the card. None the less, identification is always the core function. This explains the name of the SIM card: Subscriber Identity Module. It is a module, which identifies you (the subscriber) to the network provider.

    What is inside a SIM card?

    The best way to understand what is inside a SIM (or any other type of smart-) card is to connect it to your computer and "talk" to it. Many laptops have integrated smart-card readers nowadays, so if you find a suitable frame for your nano/micro/mini-SIM, you may simply put it into the reader just as you would do with an ID or a bank card.

    Mini-SIM in a frame

    Old mini-SIM in a frame from a newer card

    Note, though, that if your frame is flimsy and not fitting perfectly (as is mine on the photo above) you run the risk of losing the chip somewhere in the depths of the card reader slot before you even manage to slide it in completely. Hence, in my case, a tiny cross-style USB card reader was a more convenient and reliable option:

    SIM in a frame in a reader

    SIM in a frame in a reader

    Plug it in, wait until the system recognizes the device, and we are ready to talk. There are many tools for "talking" to the card on a low level, but one of the best for the purposes of educational exploration is, in my opinion, the program called CardPeek. Let us fire it up. At start up it asks for the card reader to use (note that you can use it to explore both contact and contactless cards, if you have the necessary reader):
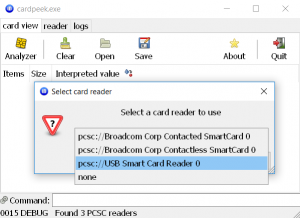
    Select reader screen

    Select reader screen

    We can now click "Analyzer → GSM SIM", provide the PIN, wait a bit, and have the program extract a wealth of information stored on the card:

    SIM card analyzed

    SIM card analyzed

    Fun, right? Let us now see where all this data came from and what it actually means.

    How does it work?

    At the hardware level, a smart card has a very simple connector with six active pins, which are designed for sending and receiving data to and from the card:
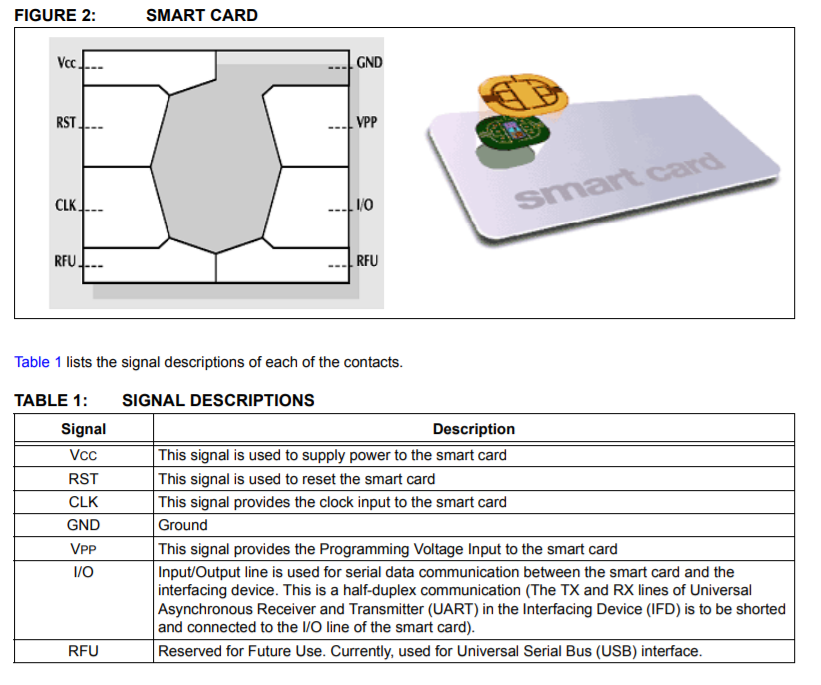
    Smart card connectors

    Smart card connectors (source)

    Four pins (VCC, GND, CLK, I/O) are used for the basic half-duplex synchronous serial communication. RST is the reset pin, and VPP is used for supplying the higher voltage when (re)programming the card. When you first connect to the card, the protocol requires to zero the "reset" pin, to which the card will reply by sending a fixed sequence of bytes, identifying the card and its capabilities. It is known as the card's ATR ("Answer To Reset") string. You can see this string listed as the "cold ATR" entry in the screenshot named "SIM card analyzed" above.

    Besides providing pre-packaged analysis scripts for various kinds of smart cards, CardPeek allows to send custom commands to the card by using its Lua scripting interface directly. This is what the "Command" text input at the bottom of the screen is for. Let us now switch to the "logs" tab and try sending some commands. First of all, we need to establish the connection to the card. This is done via the card.connect() call:
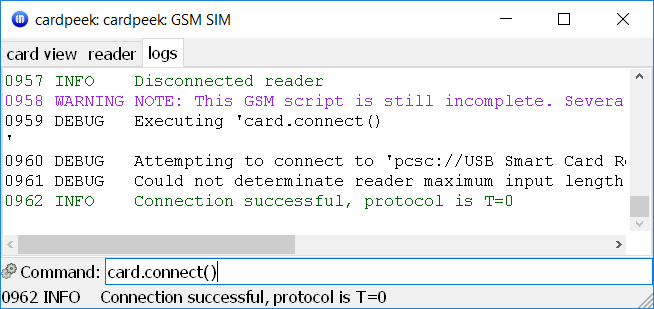
    card.connect()

    card.connect() example

    The ATR string is received by the reader when the connection is first established. We can obtain it via card.last_atr() and print out to the log window in hex-encoded form using log.print and bytes:format (the documentation for all these APIs is available here):
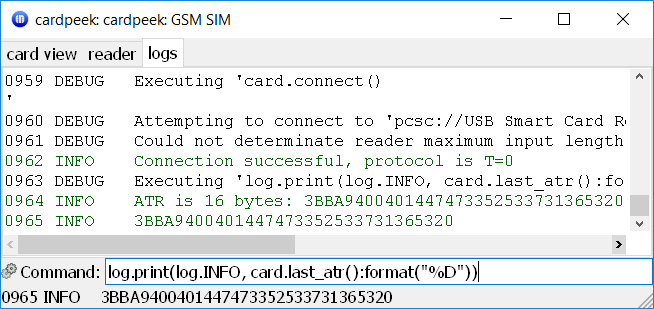
    ATR

    ATR example

    As we see, the ATR for my card happens to be 3BBA9400401447473352533731365320 (in hex).  If you search the web, you will find that this particular ATR is known to be  a signature of the Elisa SIM cards. It is not a random string, though, and every byte has a meaning. In particular:

    • 3B is the "initial byte", and this particular value identifies the smart card as a SIM card.
    • BA is the "format" byte. Its first four bits (1011) tell us that we have to expect fields TA1, TB1 and TD1 to follow. The last four bits denote the number 10 - the number of "historical bytes" at the end of the ATR.
    • 94 is the field TA1, specifying the clock rate of the serial protocol
    • 00 is the field TB1, specifying the programming voltage (apparently, the card is not re-programmable)
    • 40 tells us that we have to read out another byte field TC2 (this is in the left-side part of the byte, 4 ) and that the card uses T=0 protocol (this is in the right-side part, 0).
    • 14 is the promised TC2 field (not sure what it is meant for),
    • the last 10 bytes are the "historical bytes", providing card manufacturer-specific information.

    Greeting your Card

    Now that we are connected, we can send various commands to the card. Let us proceed by example. The first command we might want to send is "VERIFY CHV", which is essentially greeting the card by providing our PIN1 code ("CHV" stands for "Card Holder Verification").

    VERIFY CHV

    VERIFY CHV (source)

    Every smart card command starts with a two-byte identifier (for example, A0 20 is the (hex) identifier of the VERIFY CHV command). It is followed by two parameter bytes P1 and P2. For example, the parameter P1 for VERIFY CHV is always 0, and P2 must indicate the number of the PIN we are submitting (i.e. 1 for PIN1, 2 for PIN2). Next comes P3 - a byte, specifying the length of the data which follows. For VERIFY CHV the data is the provided PIN itself, and it is always 8 bytes long. If the PIN is shorter than 8 bytes, it must be padded by bytes FF. The PIN itself is encoded in plain ASCII (i.e. 1234 would be 31 32 33 34).

    Now, supposing my PIN1 is, in fact "1234", I can authenticate myself to the card via CardPeek as follows:

    sw, resp = card.send(bytes.new(8, "A0 20 00 01 08 31 32 33 34 FF FF FF FF"))

    Here, card.send is the sending command and bytes.new(8, ...) constructs an array of 8-bit bytes from a hex string (see CardPeek reference).

    The sw and resp are the two components of the T=0 protocol response. For VERIFY CHV we only care that sw is equal to 9000, which means "OK". Note how this is printed in the log.
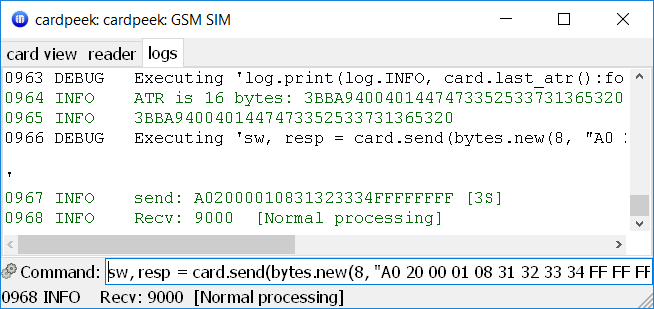
    VERIFY CHV

    VERIFY CHV example

    Beware that if you do not receive a 9000 response, it means that the card denied your PIN for some reason. Trying to submit a wrong PIN three times in a row will block the card.

    Reading the Data

    Now that we have identified ourselves to the card, let us try to read the data stored on it. The data on the card is organized in a hierarchy of files. It is this exact hierarchy that you can observe as the output of the "Analyzer" script. The root file is called "MF", it has the ICCID, TELECOM and GSM sub-files, which, in turn, have a number of predefined sub-files themselves, etc. The names are just conventions, the card itself uses two-byte identifiers for each file. For example, "MF" is actually 3F 00, "TELECOM" is 7F 10, etc. While the card is connected you can navigate around the file structure just like you would do in a normal operating system using the cd command, except that in smart-card lingo the corresponding command is called SELECT.

    The binary form of the SELECT command is A0 A4 00 00 02 {x} {y}, where {x} {y} is the file identifier. Just like before, A0 A4 is the command code, 00 00 are the ignored P1 and P2 parameters, and 02 tells us that exactly two bytes must follow.

    Consequently, if we wanted to select the file "MF (3f 00)/TELECOM (7F 10)/ADN (6F 3A)", which contains the address book records, we could achieve it by sending the following sequence of commands via CardPeek:

    card.send(bytes.new(8, "A0 A4 00 00 02 3F 00"))
    card.send(bytes.new(8, "A0 A4 00 00 02 7F 10"))
    card.send(bytes.new(8, "A0 A4 00 00 02 6F 3A"))

    Selecting files is a common task, and CardPeek provides a convenient shorthand: card.select("#7f10"). For some cards (not mine, unfortunately) it should also be possible to do things like card.select("/7f10/6f3a").

    Once we have selected the ADN ("Abbreviated Dialing Numbers") file, we may read out the individual phone numbers from it using the READ RECORD command. The procedure is complicated by the fact that READ RECORD needs to be provided the "record size" as one of its parameters, which, in turn, must be taken from the response data of the last SELECT command, and this must be obtained via the GET RESPONSE command. The complete example would therefore be:

    -- Select /TELECOM/ADN
    card.select("#7F10")
    sw, resp = card.select("#6F3A")
    
    -- Read file metadata
    GET_RESPONSE = "A0 C0 00 00"
    sw, resp = card.send(bytes.new(8, GET_RESPONSE, bit.AND(sw, 0xff)))
    
    -- Read out first record in the file
    sw, resp = card.read_record('.', 1, resp:get(14))
    
    -- Print the record to the log
    log.print(log.INFO, resp:format("%P"))
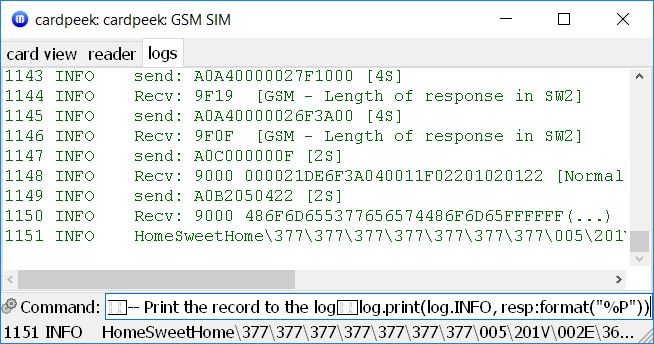
    Reading out a phone record

    Reading out a phone record

    Note that instead of printing the output to the log via log.print you could also show a message box:

    ui.readline(resp:format("%P"))

    or append a new node to the tree in the "card view" tab:

    nodes.append(nodes.root(), {classname="block", 
                                label="Name", 
                                val=resp:format("%P"), 
                                size=#resp})
    

    In fact, at this point you should go and read the script $HOME/.cardpeek/scripts/gsm (beta).lua. It contains the code we ran in the beginning of this post to analyze the card. The script simply sends the relevant commands to the card and appends all responses as nodes to the tree.

    Authentication

    While data storage is a useful capability of a SIM card, its main purpose is subscriber authentication. Thus, our acquaintance with the SIM card would be incomplete without checking the corresponding function out as well. It is quite simple:
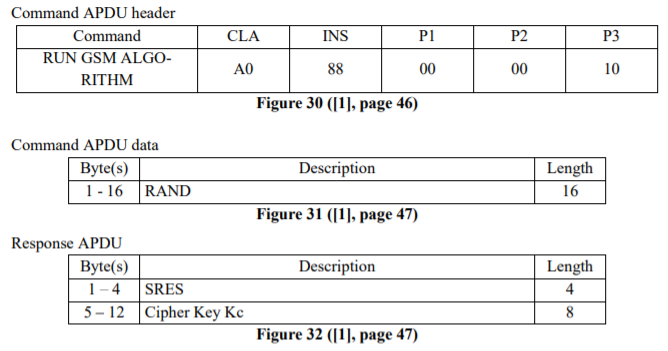
    RUN GSM ALGORITHM

    RUN GSM ALGORITHM (source)

    That is, the process is the following: we send the byte sequence A0 88 00 00 10, followed by a 16 byte-long challenge string (which is normally given by the mobile operator when the phone joins the network). The SIM card responds with 12 bytes, of which the first 4 we should send back to the mobile operator for verification, and use the remaining 8 as a cipher key.

    Before we can use the RUN GSM ALGORITHM command we need to verify our PIN1 (already done) and SELECT the GSM (7F 20) file:

    RUN_GSM_ALGO = "A0 88 00 00 10"
    GET_RESPONSE = "A0 C0 00 00"
    DF_GSM = "#7F20"
    
    CHALLENGE_STRING = "00 00 00 00 00 00 00 00 00 00 00 00 00 00 00 00"
    
    -- Select GSM file
    card.select(DF_GSM)
    
    -- Send the challenge data
    sw, resp = card.send(bytes.new(8, RUN_GSM_ALGO, CHALLENGE_STRING))
    
    -- Read 12-byte-long response
    sw, RESPONSE_STRING = card.send(bytes.new(8, GET_RESPONSE, 12))
    log.print(log.INFO, RESPONSE_STRING:format("%D"))
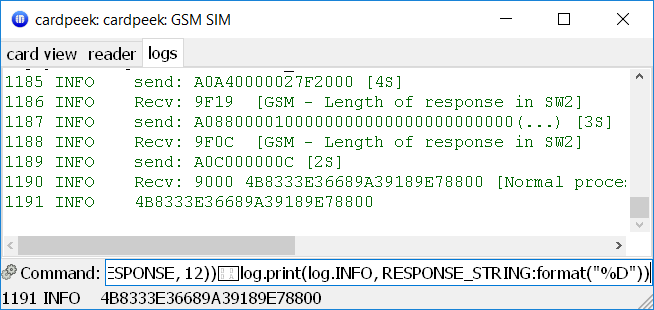
    RUN GSM ALGORITHM example

    RUN GSM ALGORITHM example

    And that is it. I hope you learned to understand and appreciate your SIM card a bit more today.

    Tags: , , , , , ,

  • Posted by Konstantin 17.03.2018 3 Comments

    I have randomly stumbled upon a Quora question "Can you write a program for adding 10 numbers" yesterday. The existing answers competed in geeky humor and code golf, so I could not help adding another take on the problem.

    Can you write a program for adding 10 numbers?

    The question offers a great chance to illustrate how to properly develop software solutions to real-life problems such as this one.

    First things first - let us analyze the requirements posed by the customer. They are rather vague, as usual. It is not clear what “numbers” we need to add, where and how should these “numbers” come from, what is really meant under “adding”, what should we do with the result, what platform the software is supposed to be running on, what are the service guarantees, how many users are expected, etc.

    Of course, we do not want to discover that we misunderstood some of the requirements late in the development cycle, as this could potentially require us to re-do all of the work. To avoid such unpleasant surprises we should be planning for a general, solid, enterprise-grade solution to the problem. After a short meeting of the technical committee we decided to pick C# as the implementation platform. It is OS-independent and has many powerful features which should cover any possible future needs. For example, if the customer would decide to switch to a cluster-based, parallel implementation later along the way, we’d quickly have this base covered. Java could also be a nice alternative, but, according to the recent developer surveys, C# development pays more.

    The Architecture

    Let us start by modeling the problem on a higher level. The customer obviously needs to process (“add”) some data (“10 numbers”). Without getting into too much detail, this task can be modeled as follows:

    interface IInputProvider {}
    interface IOutput {}
    interface ISolution {
        IOutput add10(IInputProvider input);    
    }

    Note how we avoid specifying the actual sources of input and output yet. Indeed, we really don’t know where the “10 numbers” may be coming from in the future - these could be read from standard input, sent from the Internet, delivered by homing pigeons, or teleported via holographic technology of the future - all these options are easily supported by simply implementing IInputProvider appropriately.

    Of course, we need to do something about the output once we obtain it, even though the customer forgot to mention this part of the problem. This means we will also have to implement the following interface:

    interface IOutputConsumer {
        void consumeOutput(IOutput output);
    }

    And that is it - our general solution architecture! Let us start implementing it now.

    The Configuration

    The architecture we work with is completely abstract. An actual solution would need to provide implementations for the IInputProviderIOutputConsumer and ISolution interfaces. How do we specify which classes are implementing these interfaces? There are many possibilities - we could load this information from a database, for example, and create a dedicated administrative interface for managing the settings. For reasons of brevity, we’ll illustrate a simplistic XML-based factory method pattern.

    Namely, we shall describe the necessary implementations in the XML file config.xml as follows:

    <Config>
        <InputProvider class="Enterprise.NumberSequenceProvider"/>
        <OutputConsumer class="Enterprise.PeanoNumberPrinter"/>
        <Solution class="Enterprise.TenNumbersAddingSolution"/>
    </Config>

    A special SolutionFactory class can now load this configuration and create the necessary object instances. Here’s a prototype implementation:

    class SolutionFactory {
        private XDocument cfg;
        public SolutionFactory(string configFile) {
            cfg = XDocument.Load(configFile);
        }
        public IInputProvider GetInputProvider() {
            return Instantiate<IInputProvider>("InputProvider");
        }
        public IOutputConsumer GetOutputConsumer() {
            return Instantiate<IOutputConsumer>("OutputConsumer");
        }
        public ISolution GetSolution() {
            return Instantiate<ISolution>("Solution");
        }
        private T Instantiate<T>(string elementName) {
            var typeName = cfg.Root.Element(elementName)
                                   .Attribute("class").Value;
            return (T)Activator.CreateInstance(Type.GetType(typeName));
        }
    }

    Of course, in a real implementation we would also worry about specifying the XML Schema for our configuration file, and make sure it is possible to override the (currently hard-coded) “config.xml” file name with an arbitrary URI using command-line parameters or environment variables. In many real-life enterprise solutions in Java, for example, even the choice of the XML parsing library would need to be configured and initialized using its own factory pattern. I omit many of such (otherwise crucial) details for brevity here.

    I am also omitting the unit-tests, which, of course, should be covering every single method we are implementing.

    The Application

    Now that we have specified the architecture and implemented the configuration logic, let us put it all together into a working application. Thanks to our flexible design, the main application code is extremely short and concise:

    class Program {
        static void Main(string[] args) {
            var sf = new SolutionFactory("config.xml");
            var ip = sf.GetInputProvider();
            var oc = sf.GetOutputConsumer();
            var sol = sf.GetSolution();
            var op = sol.add10(ip);
            oc.consumeOutput(op);
        }
    }

    Amazing, right? Well, it does not really work yet, of course, because we still need to implement the core interfaces. However, at this point we may conclude the work of the senior architect and assign the remaining tasks of filling in the blanks to the the main engineering team.

    The Inputs and Outputs

    Now that we have set up the higher-level architecture, we may think a bit more specifically about the algorithm we plan to implement. Recall that we need to “add 10 numbers”. We don’t really know what these “numbers” should be - they could be real numbers, complex numbers, Roman numerals or whatnot, so we have to be careful and not rush into making strict assumptions yet. Let’s just say that a “number” is something that can be added to another number:

    interface INumber {
        INumber add(INumber other);
    }

    We’ll leave the implementation of this interface to our mathematicians on the team later on.

    At this step we can also probably make the assumption that our IInputProviderimplementation should somehow give access to ten different instances of an INumber. We don’t know how these instances are provided - in the worst case each of them may be obtained using a completely different method and at completely different times. Consequently, one possible template for an IInputProvider could be the following:

    interface ITenNumbersProvider: IInputProvider {
        INumber GetNumber1();
        INumber GetNumber2();
        INumber GetNumber3();
        INumber GetNumber4();
        INumber GetNumber5();
        INumber GetNumber6();
        INumber GetNumber7();
        INumber GetNumber8();
        INumber GetNumber9();
        INumber GetNumber10();
    }

    Note how, by avoiding the use of array indexing, we force the compiler to require that any implementation of our ITenNumbersProvider interface indeed provides exactly ten numbers. For brevity, however, let us refactor this design a bit:

    enum NumberOfANumber {
        ONE, TWO, THREE, FOUR, FIVE, SIX, SEVEN, EIGHT, NINE, TEN
    }
    interface ITenNumbersProvider: IInputProvider {
        INumber GetNumber(NumberOfANumber noan);
    }

    By listing the identities of our “numbers” in an enum we still get some level of compile-time safety, although it is not as strong any more, because enum is, internally, just an integer. However, we god rid of unnecessary repetitions, which is a good thing. Refactoring is an important aspect of enterprise software development, you see.

    The senior architect looked at the proposed interface at one of our regular daily stand-ups, and was concerned with the chosen design. “Your interface assumes you can provide immediate access to any of the ten numbers”, he said. But what if the numbers cannot be provided simultaneously and will be arriving at unpredictable points in time? If this were the case, an event-driven design would be much more appropriate:

    delegate void NumberHandler(NumberOfANumber id, INumber n);
     
    interface IAsynchronousInputProvider: IInputProvider {
        void AddNumberListener(NumberHandler handler);
    }

    The adding subsystem would then simply subscribe to receive events about the incoming numbers and handle them as they come in.

    “This is all good and nice”, responded the mathematician, “but for efficient implementation of the addition algorithm we might need to have all ten numbers available at the same time”. “Ah, software design 101”, says the senior architect. We simply install an adapter class. It would pool the incoming data until we have all of it, thus converting the IAsynchronousInputProvider, used for feeding the data, into an ITenNumbersProvider, needed by the mathematician:

    class SyncronizationAdapter: ITenNumbersProvider {
       private Dictionary<NumberOfANumber, INumber> nums;
       private ManualResetEvent allDataAvailableEvent;
     
       public SynchronizationAdapter(IAsynchronousInputProvider ainput){
           nums = new Dictionary<NumberOfANumber, INumber>();
           allDataAvailableEvent = new ManualResetEvent(false);
           ainput.AddNumberListener(this.HandleIncomingNumber);
       }
       private void HandleIncomingNumber(NumberOfANumber id, INumber n){
           nums[id] = n;
           if (Enum.GetValues(typeof(NumberOfANumber))
                   .Cast<NumberOfANumber>()
                   .All(k => nums.ContainsKey(k)))
                allDataAvailableEvent.Set();
       }
       public INumber GetNumber(NumberOfANumber noan) {
           allDataAvailableEvent.WaitOne();
           return nums[noan];
       }
    }

    Now the mathematician can work on his addition logic without having to know anything about the way the numbers are coming in. Convenient, isn’t it?

    Note that we are still only providing the input interface specification (along with an adapter) here. The actual implementation has to wait until our mathematicians come up with an implementation of INumber and the data engineers decide on how to obtain ten of these in the most optimal way.

    But what about IOutput? Let us assume that we expect to output a single number. This means that INumber must itself already be an instance of IOutput:

    interface INumber: IOutput {
       INumber add(INumber other);
    }

    No need to implement anything, we just add an interface tag to INumber! See how object-oriented design techniques allow us to save development time!

    The Order of Addition

    OK, so we now have a concept of an INumber which has a (binary) addition operation defined, an ITenNumbersProvider which can provide ten INumber instances (conveniently abstracting away the IAsynchrhonousInputProvider which actually obtains the numbers), and our goal is to add them up to get an IOutput which is itself an INumber. Sounds easy, right? Not so fast! How exactly are we going to add these numbers? After all, maybe in some cases adding ((a+b)+c)+d)… can be less efficient or precise than (a+(b+(c+(d…. Or maybe the optimal addition strategy is to start from the middle and then add numbers in some order? There do exist nontrivial ways to add up numbers, you know. To accommodate for any possible options in the future (so that we wouldn’t have to rewrite the code unnecessarily), we should design our solution in a way that would let us switch our addition strategy easily, should we discover a better algorithm. One way to do it is by abstracting the implementation behind the following interface:

    interface IAdditionStrategy {
       INumber fold(Func<NumberOfANumber, INumber> elements,
                    Func<INumber, INumber, INumber> op); 
    }

    You see, it is essentially a functor, which gets a way to access our set of numbers (via an accessor function) along with a binary operator “op”, and “folds” this operator along the number set in any way it deems necessary. This particular piece was designed by Harry, who is a huge fan of functional programming. He was somewhat disappointed when we decided not to implement everything in Haskell. Now he can show how everyone was wrong. Indeed, the IAdditionStrategy is a core element of our design, after all, and it happens to look like a fold-functor which takes functions as inputs! “I told you we had to go with Haskell!”, says Harry! It would allow us to implement all of our core functionality with a much higher level of polymorphism than that of a simplistic C# interface!

    The Solution Logic

    So, if we are provided with the ten numbers via ITenNumbersProvider and an addition strategy via IAdditionStrategy, the implementation of the solution becomes a very simple matter:

    class TenNumbersAddingSolution: ISolution {
       private IAdditionStrategy strategy;
       public TenNumbersAddingSolution() {
           strategy = ...
       }
       public IOutput add10(IInputProvider input) {
           var tenNumbers = new SynchronizationAdapter(
                          (IAsynchronousInputProvider)input);
           return strategy.fold(i => tenNumbers.GetNumber(i), 
                                (x,y) => x.add(y));
       }
    }

    We still need to specify where to take the implementation of the IAdditionStrategy from, though. This would be a good place to refactor our code by introducing a dependency injection configuration framework such as the Autofac library. However, to keep this text as short as possible, I am forced to omit this step. Let us simply add the “Strategy” field to our current config.xml as follows:

    <Config>
        ...
        <Solution class="Enterprise.TenNumbersAddingSolution">
            <Strategy class="Enterprise.AdditionStrategy"/>
        </Solution>
    </Config>

    We could now load this configuration setting from the solution class:

        ...
        public TenNumbersAddingSolution() {
            var cfg = XDocument.Load("config.xml");
            var typeName = cfg.Root
                   .Element("Solution")
                   .Element("Strategy")
                   .Attribute("class").Value;
            strategy = (IAdditionStrategy)Activator
                   .CreateInstance(Type.GetType(typeName));
        }
        ...

    And voilà, we have our solution logic in place. We still need to implement INumberIAdditionStrategyITenNumbersProvider and IOutputConsumer, though. These are the lowest-level tasks that will force us to make the most specific decisions and thus determine the actual shape of our final product. These will be done by the most expert engineers and mathematicians, who understand how things actually work inside.

    The Numbers

    How should we implement our numbers? As this was not specified, we should probably start with the simplest possible option. One of the most basic number systems from the mathematician’s point of view is that of Peano natural numbers. It is also quite simple to implement, so let’s go for it:

    class PeanoInteger: INumber {
        public PeanoInteger Prev { get; private set; }
        public PeanoInteger(PeanoInteger prev) { Prev = prev; }
        public INumber add(INumber b) {
            if (b == null) return this;
            else return new PeanoInteger(this)
                    .add(((PeanoInteger)b).Prev);
        }
    }

    Let us have IOutputConsumer print out the given Peano integer as a sequence of “1”s to the console:

    class PeanoNumberPrinter: IOutputConsumer {
        public void consumeOutput(IOutput p) {
            for (var x = (PeanoInteger)p; x != null; x = x.Prev)
                 Console.Write("1");
            Console.WriteLine();
        }
    }

    Finally, our prototype IAdditionStrategy will be adding the numbers left to right. We shall leave the option of considering other strategies for later development iterations.

    class AdditionStrategy: IAdditionStrategy {
        public INumber fold(Func<NumberOfANumber, INumber> elements,
                            Func<INumber, INumber, INumber> op) {
           return Enum.GetValues(typeof(NumberOfANumber))
                      .Cast<NumberOfANumber>()
                      .Select(elements).Aggregate(op);
        }
    }

    Take a moment to contemplate the beautiful abstraction of this functional method once again. Harry’s work, no doubt!

    The Input Provider

    The only remaining piece of the puzzle is the source of the numbers, i.e. the IAsynchronousInputProvider interface. Its implementation is a fairly arbitrary choice at this point - most probably the customer will want to customize it later, but for the purposes of our MVP we shall implement a simple sequential asynchronous generator of Peano numbers {1, 2, 3, …, 10}:

    class NumberSequenceProvider: IAsynchronousInputProvider {
        private event NumberHandler handler;
        private ManualResetEvent handlerAvailable;
     
        public NumberSequenceProvider() {
            handlerAvailable = new ManualResetEvent(false);
            new Thread(ProduceNumbers).Start();
        }
        public void AddNumberListener(NumberHandler nh) {
            handler += nh;
            handlerAvailable.Set();
        }
        private void ProduceNumbers() {
            handlerAvailable.WaitOne();
            PeanoInteger pi = null;
            foreach (var v in Enum.GetValues(typeof(NumberOfANumber))
                                  .Cast<NumberOfANumber>()) {
                    pi = new PeanoInteger(pi);
                    handler(v, pi);
            }
        }
    }

    Note that we have to be careful to not start publishing the inputs before the number processing subsystem attaches to the input producer. To achieve that we rely on the event semaphore synchronization primitive. At this point we can clearly see the benefit of choosing a powerful, enterprise-grade platform from the start! Semaphores would look much clumsier in Haskell, don’t you think, Harry? (Harry disagrees)

    So here we are - we have a solid, enterprise-grade, asynchronous, configurable implementation for an abstractly defined addition of abstractly defined numbers, using an abstract input-output mechanism.

    $> dotnet run
    1111111111111111111111111111111111111111111111111111111

    We do need some more months to ensure full test coverage, update our numerous UML diagrams, write documentation for users and API docs for developers, work on packaging and installers for various platforms, arrange marketing and sales for the project (logo, website, Facebook page, customer relations, all that, you know), and attract investors. Investors could then propose to pivot the product into a blockchain-based, distributed solution. Luckily, thanks to our rock solid design abstractions, this would all boil down to reimplementing just a few of the lower-level interfaces!

    Software engineering is fun, isn’t it?

    The source code for the developed solution is available here.

    Tags: , , , , ,

  • Posted by Konstantin 21.04.2015 No Comments
    "Hello world" in Flask

    "Hello world" in Flask

    Over the recent years I happen to have made several small personal projects using Python's Flask web framework. The framework is designed to provide a very minimalistic "bottom-up" approach. It feels slightly less cluttered and imposing than some of the popular alternatives, thus fitting nicely for the projects a single person might typically want to hack up in a spare weekend. Minimalism of Flask does not mean it is somehow limited or unsuitable for larger projects - perhaps on the contrary, small size of the framework means there are fewer restrictions on what and how you can do with it.

    What a small framework needs to be applied comfortably beyond its 6-line "Hello-World" use case, however, is a decent starter project template that would include some of the most common bells and whistles. And indeed, there happen to be several such templates available. I used parts of them over time in my own projects, however I always ended redoing/rewriting/renaming bits and pieces to fit my personal aesthetic needs. Eventually I got tired of renaming and packaged a Flask application template in the way I consistently prefer to use it. I am not sure whether it is objectively better or worse than the alternatives. None the less, if at some point you decide to give Flask a try, let me suggest you try this template of mine as your point of origin.

    Tags: , , , , ,

  • Posted by Konstantin 19.03.2014 1 Comment

    Despite the popularity of Python, I find that many of its best practices are not extremely well-documented. In particular, whenever it comes to starting a new Python project, quite a lot of people would follow whatever the very first Python tutorial taught them (or whatever their IDE creates), and start churning out .py files, perhaps organizing them into subdirectories along the way. This is not a good idea. Eventually they would stumble upon problems like "how do I distribute my code""how do I manage dependencies", "where do I put documentation""how (and when) should I start writing tests for my code", etc. Dealing with those issues "later" is always much more annoying than starting with a proper project layout in the first place.

    Although there is no unique standard for a project layout, there are some established best practices. In particular (and this seems to be not very widely known), one of the easiest ways to create a new Python package (i.e., develop anything in Python that will have to be distributed later), is to make use of the paster or cookiecutter tools. Simply running

    $ paster create <package_name>

    or

    $ cookiecutter https://github.com/audreyr/cookiecutter-pypackage.git

    will ask you some questions and initialize a well-formed setuptools-based package layout for you. A slightly more involved yet still minimalistic starter code is provided by additional paster/cookiecutter templates, such as modern-package-template:

    $ pip install modern-package-template
    $ paster create -t modern_package <package_name>

    Naturally, every developer will tend to customize the setup, by adding the necessary tools. Moreover, the preferred setup evolves with time, as various tools and services come in and out of existence. Ten years ago, buildout or git were not yet around. Five years ago, there was no tox and nose was better than py.test. Services like Travis-CI and Github are even younger yet.

    Although I tend to experiment a lot with my setup, over the recent couple of years I seem to have converged to a fairly stable Python environment, which I decided to share as a reusable template and recommend anyone to make use of it.

    Thus, next time you plan to start a new Python project, try beginning with:

    $ pip install python_boilerplate_template
    $ paster create -t python_boilerplate <project_name>

    or, alternatively,

    $ pip install cookiecutter
    $ cookiecutter https://github.com/konstantint/cookiecutter-python-boilerplate

    More information here (for paster) or here (for cookiecutter). Contributions and constructive criticism welcome via Github.

    Tags: , , , ,