• Posted by Konstantin 15.03.2015 2 Comments

    Anyone who has had to deal with scientific literature must have encountered Postscript (".ps") files. Although the popularity of this format is gradually fading behind the overwhelming use of PDFs, you can still find .ps documents on some major research paper repositores, such as arxiv.org or citeseerx. Most people who happen to produce those .ps or .eps documents, do it using auxiliary tools, most commonly while typesetting their papers in LaTeX, or while preparing images for those papers using a vector graphics editor (e.g. Inkscape). As a result, Postscript tends to be regarded by the majority of its users as some random intermediate file format, akin to any of the myriad of other vector graphics formats.

    I find this situation unfortunate and unfair towards Postscript. After all, PS is not your ordinary vector graphics format. It is a fully-fledged Turing-complete programming language, that is well thought through and elegant in its own ways. If it were up to me, I would include a compulsory lecture on Postscript into any modern computer science curriculum. Let me briefly show you why.

    Stack-based programming

    Firstly, PostScript is perhaps the de-facto standard example of a proper purely stack-based language in the modern world. Other languages of this group are nowadays either dead, too simpletoo niche, or not practical. Like any stack language, it looks a bit unusual, yet it is simple to reason about and its complete specification is decently short. Let me show you some examples:

    2 2 add     % 2+2 (the two numbers are pushed to the stack,
                % then the add command pops them and replaces with
                % the resulting value 4)
    /x 2 def                  % x := 2 (push symbol "x", push value 2,
                              %         pop them and create a definition)
    /y x 2 add def            % y := x + 2 (you get the idea)
    (Hello!) show             % print "Hello!"
    x 0 gt {(Yes) show} if    % if (x > 0) print "Yes"

    Adding in a couple of commands that specify font parameters and current position on the page, we may write a perfectly valid PS file that would perform arithmetic operations, e.g:

    /Courier 10 selectfont   % Font we'll be using
    72 720 moveto            % Move cursor to position (72pt, 720pt)
                             % (0, 0) is the lower-left corner
    (Hello! 2+2=) show
    2 2 add                  % Compute 2+2
    ( ) cvs                  % Convert the number to a string.
                             % (First we had to provide a 1-character
                             % string as a buffer to store the result)
    show                     % Output "4"

    Computer graphics

    Postscript has all the basic facilities you'd expect from a programming language: numbers, strings, arrays, dictionaries, loops, conditionals, basic input/output. In addition, being primarily a 2D graphics language, it has all the standard graphics primitives. Here's a triangle, for example:

    newpath           % Define a triangle
        72 720 moveto
        172 720 lineto
        72 620 lineto
    closepath
    gsave             % Save current path
    10 setlinewidth   % Set stroke width
    stroke            % Stroke (destroys current path)
    grestore          % Restore saved path again
    0.5 setgray       % Set fill color
    fill              % Fill

    Postscript natively supports the standard graphics transformation stack:

    /triangle {       % Define a triangle of size 1 n the 0,0 frame
        newpath
            0 0 moveto
            1 0 lineto
            0 1 lineto
        closepath
        fill
    } def
    
    72 720 translate      % Move origin to 72, 720
    gsave                 % Push current graphics transform
        -90 rotate        % Draw a rotated triangle
        72 72 scale       % .. with 1in dimensions
        triangle
    grestore              % Restore back to non-scaled, non-rotated frame
    gsave
        100 0 translate   % Second triangle will be next to the first one
        32 32 scale       % .. smaller than the first one
        triangle          % .. and not rotated
    grestore

    Here is the result of the code above:

    Two triangles

    Two triangles

    The most common example of using a transformation stack is drawing fractals:

    /triangle {
        newpath
            0 0 moveto
            100 0 lineto
            0 -100 lineto
        closepath
        fill
    } def
    
    /sierpinski {
        dup 0 gt
        {
            1 sub
            gsave 0.5 0.5 scale dup sierpinski grestore
            gsave 50 0 translate 0.5 0.5 scale dup sierpinski grestore
            gsave 0 -50 translate 0.5 0.5 scale sierpinski grestore
        }
        { pop triangle }
        ifelse
    } def
    72 720 translate  % Move origin to 72, 720
    5 5 scale
    5 sierpinski
    Sierpinski triangle

    Sierpinski triangle

    With some more effort you can implement nonlinear dynamic system (Mandelbrot, Julia) fractals, IFS fractals, or even proper 3D raytracing in pure PostScript. Interestingly, some printers execute PostScript natively, which means all of those computations can happen directly on your printer. Moreover, it means that you can make a document that will make your printer print infinitely many pages. So far I could not find a printer that would work that way, though.

    System access

    Finally, it is important to note that PostScript has (usually read-only) access to the information on your system. This makes it possible to create documents, the content of which depends on the user that opens it or machine where they are opened or printed. For example, the document below will print "Hello, %username", where %username is your system username:

    /Courier 10 selectfont
    72 720 moveto
    (Hi, ) show
    (LOGNAME) getenv {} {(USERNAME) getenv pop} ifelse show
    (!) show

    I am sure, for most people, downloading a research paper from arxiv.org that would greet them by name, would probably seem creepy. Hence this is probably not the kind of functionality one would exploit with good intentions. Indeed, Dominique has an awesome paper that proposes a way in which paper reviewers could possibly be deanonymized by including user-specific typos in the document. Check out the demo with the source code.

    I guess this is, among other things, one of the reasons we are going to see less and less of Postscript files around. But none the less, this language is worth checking out, even if only once.

    Tags: , , , ,

  • Posted by Konstantin 22.01.2015 38 Comments

    Update from year 2017: The tool described in this post DOES NOT WORK with recent versions of Skype. Either these versions stopped saving removed messages altogether, or they are doing it in a novel manner not recognized by the tool.

    In other words - you would only recover "removed" messages if you are running older version of Skype (or these messages were sent at the time you were using that older version).

    Yesterday I happened to attend a discussion about the security and privacy of information stored locally in Skype and Thunderbird profiles. It turns out, if you obtain a person's Skype profile directory, you will be able to log in as him without the need to know the password. In addition, Dominique made a remark that Skype does not really delete the messages that are marked as "removed" in the chat window. I found that curious and decided to take a closer look.

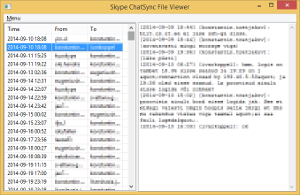
    Indeed, there is a bunch of *.dat files in the chatsync subdirectory of the Skype's profile, which preserve all messages along with all their edits or deletions. Unfortunately, the *.dat files are in some undocumented binary format, and the only tool I found for reading those lacks in features. However, hacking up a small Python parser according to what is known about the format, along with a minimalistic GUI is a single evening's exercise, and I happened to be in the mood for some random coding.

    Skype Chatsync Viewer

    Skype Chatsync Viewer

    Now, if you want to check out what was that message you or your conversation partner wrote before it was edited or deleted, this package will help. If you are not keen on installing Python packages, here is a standalone Windows executable.

    Tags: , , , , , , ,

  • Posted by Konstantin 13.01.2015 No Comments

    I haven't updated this blog for quite some time, which is a shame. Before I resume I wanted to reproduce here a couple of my old posts from other places. This particular piece stems from a post on our research group's webpage from more than 8 years ago, but is about an issue that never stops popping up in practice.

    Precision of floating point numbers is a very subtle issue. It creeps up so rarely that many people (me included) would get it out of their heads completely before stumbling upon it in some unexpected place again.

    Indeed, most of the time it is not a problem at all, that floating point computations are not ideally precise, and no one cares about the small additive noise that it produces, as long as you remember to avoid exact comparisons between floats. Sometimes, however, the noise can severely spoil your day by violating the core assumptions, such as "distance is always greater than zero", or "cosine of an angle never exceeds 1".

    The following is, I think, a marvelous example, discovered by Alex, while debugging an obscure problem in one Python program. The choice of the language is absolutely irrelevant, however, so I took the liberty of presenting it here using Javascript (because this lets you reproduce it in your browser's console, if you wish). For Python fans, there is an interactive version available here as well.

    A cosine distance metric is a measure of dissimilarity of two vectors, often used in information retrieval and clustering, that is defined as follows:

        \[\mathrm{cdist}(\mathbf{x},\mathbf{y}) = 1 - \frac{\mathbf{x}^T\mathbf{y}}{|\mathbf{x}| \; |\mathbf{y}|}\]

    A straightforward way to put this definition into code is, for example, the following:

    function length(x) {
        return Math.sqrt(x[0]*x[0] + x[1]*x[1]);
    }
    
    function cosine_similarity(x, y) {
        return (x[0]*y[0] + x[1]*y[1])/length(x)/length(y);
    }
    
    function cosine_distance(x, y) {
        return 1 - cosine_similarity(x, y);
    }

    Now, mathematically, the cosine distance is a valid distance function and is thus always positive. Unfortunately, the floating-point implementation of it presented above, is not the same. Check this out:

    > Math.sign(cosine_distance([6.0, 6.0], [9.0, 9.0]))
    < -1

    Please, beware of float comparisons. In particular, think twice next time you use the sign() function.

    Tags: , ,

  • Posted by Konstantin 19.03.2014 1 Comment

    Despite the popularity of Python, I find that many of its best practices are not extremely well-documented. In particular, whenever it comes to starting a new Python project, quite a lot of people would follow whatever the very first Python tutorial taught them (or whatever their IDE creates), and start churning out .py files, perhaps organizing them into subdirectories along the way. This is not a good idea. Eventually they would stumble upon problems like "how do I distribute my code""how do I manage dependencies", "where do I put documentation""how (and when) should I start writing tests for my code", etc. Dealing with those issues "later" is always much more annoying than starting with a proper project layout in the first place.

    Although there is no unique standard for a project layout, there are some established best practices. In particular (and this seems to be not very widely known), one of the easiest ways to create a new Python package (i.e., develop anything in Python that will have to be distributed later), is to make use of the paster or cookiecutter tools. Simply running

    $ paster create <package_name>

    or

    $ cookiecutter https://github.com/audreyr/cookiecutter-pypackage.git

    will ask you some questions and initialize a well-formed setuptools-based package layout for you. A slightly more involved yet still minimalistic starter code is provided by additional paster/cookiecutter templates, such as modern-package-template:

    $ pip install modern-package-template
    $ paster create -t modern_package <package_name>

    Naturally, every developer will tend to customize the setup, by adding the necessary tools. Moreover, the preferred setup evolves with time, as various tools and services come in and out of existence. Ten years ago, buildout or git were not yet around. Five years ago, there was no tox and nose was better than py.test. Services like Travis-CI and Github are even younger yet.

    Although I tend to experiment a lot with my setup, over the recent couple of years I seem to have converged to a fairly stable Python environment, which I decided to share as a reusable template and recommend anyone to make use of it.

    Thus, next time you plan to start a new Python project, try beginning with:

    $ pip install python_boilerplate_template
    $ paster create -t python_boilerplate <project_name>

    or, alternatively,

    $ pip install cookiecutter
    $ cookiecutter https://github.com/konstantint/cookiecutter-python-boilerplate

    More information here (for paster) or here (for cookiecutter). Contributions and constructive criticism welcome via Github.

    Tags: , , , ,

  • Posted by Konstantin 12.03.2014 No Comments

    Whenever you write a program, you want this program to behave correctly and do what you want it to do. Thus, programming always goes together with the mental act of proving to yourself (and sometimes to other people as well), that the code you write is correct. Most often this "proof" is implicit, dissolved in the way you write your code and comment it. In fact, in my personal opinion, "good code" is exactly the one, where a human-reviewer is able to verify its correctness without too much effort.

    It is natural to use computers to help us verify correctness. Everyone who has ever programmed in a strictly-typed programming language, such as Java or Haskell, is familiar with the need to specify types of variables and functions and follow strict rules of type-safety. But of course, ensuring type-safety is just the compiler's way to help you ensure some basic claims about the program, such as "this variable will always contain an integer" or "this function will always be invoked with exactly three parameters".

    This is very convenient, yet can be somewhat limiting or annoying at times. After all, type-safety requires you to write code that "can be type-checked". Although very often this is expected of "good code" anyway, there are situations where you would like some more flexibility. For this reason some languages impose no type-safety rules at all (e.g. Python or Javascript), and some languages let you disable type-checking for parts of code.

    Rather than disabling the type checker, another principled way to allow more flexibility is to make the type-checker smarter. This is the promise of dependent types. In principle, a language, which supports dependent types, would let you make much more detailed statements about your program and have your program automatically checked for correctness with respect to those statements. Rather than being limited to primitive claims like "this variable is an integer", the use of dependent types enables you to assert things like "this is a sorted list", or "this is an odd integer", and so on up to nearly arbitrary level of detail, in the form of a type annotation. At least that much I found out during a course at the recent winter school.

    The course was based on the Agda programming language, and the first thing I decided to try implementing in Agda is a well-typed version of the following simple function:

    f t = if t then true else 0

    It might look like something trivial, yet most traditional strictly typed languages would not let you write this. After all, a function has to have a return type, and it has to be either a Boolean or an Integer, but not both. In this case, however, we expect our function to have a parameter-dependent type:

    f : (t : Bool) → if t then Bool else Integer

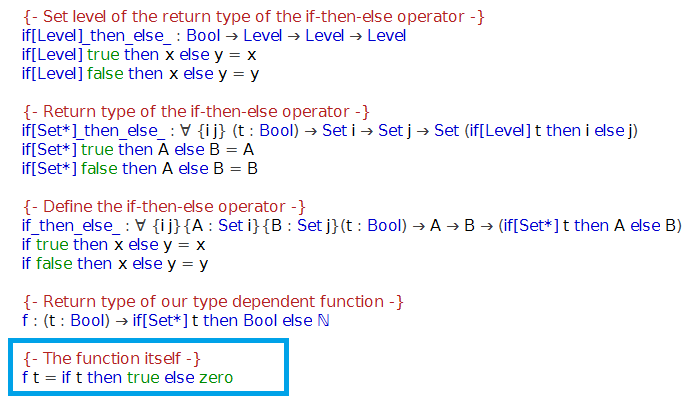
    Given that Agda is designed to support dependent types, how complicated could it be to implement such a simple function? It turns out, it takes a beginner more than an hour of thinking and a couple of consultations with the specialists in the field. The resulting code will include at least three different definitions of "if-then-else" statements and, I must admit, some aspects of it are still not completely clear to me.

    IF-THEN-ELSE in Agda

    IF-THEN-ELSE in Agda, including all the boilerplate code

    This is the longest code I've ever had to write to specify a simple if-then-else statement. The point of this blog post is to share the amusement and suggest you to check out Agda if you are in the mood for some puzzle-solving.

    As for dependent types, I guess those are not becoming mainstream any time soon.

    Tags: , , , , ,

  • Posted by Konstantin 25.02.2013 9 Comments

    Most of bioinformatics revolves, in one way or another, around the genome. Even in the largely "non-genomic" areas, such as systems biologyproteomics, or metabolomics, the key players are still genes, proteins, and their regulatory regions, which can be associated with particular points on the genome. Consequently, no matter what kind of data you work with, if you do bioinformatics, you will sooner or later have to deal with genomic coordinates.

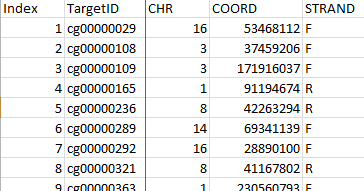
    To interpret genomic coordinates you need to know the reference genome version and coordinate conventions used. Does the data file mention those?

    To interpret genomic coordinates you need to know the reference genome version and coordinate conventions used. Does the data file mention those?

    Surprisingly, despite being of such central importance to bioinformatics, the whole genomic coordinate business seems to be in a rather unfriendly state nowadays. Firstly, there are several ways to refer to genomic positions (e.g. 0-based vs 1-based indexing), and for every possible combination of conventions, there is at least one file format that will be using it. Then, of course, you have to deal with several versions of the reference genome, and, to make your life harder yet, most data files will not tell you what genome version should be used to interpret the coordinates stored there. Finally, if you decide that you need to unify the coordinates among your different data files by converting them to the same reference genome version, you will find out that your only tools here are a couple of heavyweight web apps and a command-line UCSC liftOver utility. Should you look for R or Python libraries to script your task, you will discover that those do no smarter than forward all the conversion tasks to that same liftOver.

    I found this is all to be extremely wrong and hacked up a tiny Python tool recently, which will happily convert your coordinates without the need to invoke an external liftOver process. It does not fully replace liftOver (yet?), as it does not convert regions - a task just a bit more tricky than lifting over single points. However it lets you do single-point conversion in the simplest way possible:

    from pyliftover import LiftOver
    lo = LiftOver('hg17', 'hg18')
    lo.convert_coordinate('chr1', 1000000, '-') # 0-based indexing

    As usual, install via: easy_install pyliftover (or pip install pyliftover)

    For more information consult the PyPI page.

    Tags: , , , ,

  • Posted by Konstantin 09.05.2011 2 Comments

    I have recently realized that my HP 8440p laptop has a built-in "Qualcomm un2420 Broadband Module" device, also known as a "3G modem". For some reason no drivers were preinstalled for it on my system, and with the SIM card slot concealed behind the battery, it was not something I noticed immediately. Once the drivers were installed, the operating system had no problem recognizing the new "Mobile Broadband Connection" opportunity, and with the SIM card in the slot, I could connect to the Internet via 3G, yay.

    Knowing that there is more to mobile communication than Internet access, I was wondering whether I could do anything else, like voice calls or SMS. Unfortunately, my attempts of finding any reasonable software packages, which would open up the power of 3G to me at the click of a button, failed. Instead, however, I discovered that it is actually quite easy to communicate with the modem directly. It turns out you can control your shiny bleeding-edge 3.5G device by sending plain old AT commands to it over a serial port. This is the same protocol that the wired grandpa-modems have been speaking since the 70s and it is fun to see this language was kept along all the way into the wireless century.

    Let me show you how it works. Try to follow along — this is kinda fun.

    Finding your Modem

    If your computer does not have a built-in 3G modem, chances are high your garden variety cellphone does (not to mention smartphones, of course). If it is the case, then:

    • Switch on the Bluetooth receiver on your phone (for older Nokias this is usually in the "Settings -> Connectivity -> Bluetooth" menu).
    • On your computer, go to "Devices and Printers", click "Add a device", wait until your phone appears on the list, double click it and follow the instructions to establish the connection. (I'm talking about Windows 7 here, but the procedure should be similar for most modern OSs).
    • Once the computer recognizes your phone and installs the necessary drivers, it will appear as an icon in the "Devices" window. Double click it to open the "Properties" window, and make sure there is a "Standard Modem over Bluetooth link" function or something similar in the list.

      Cellphone Functions

      Cellphone Functions

    • Double-click that "modem" entry, a new properties window opens. Browse along in it, and find the COM port number that was assigned to the modem.

      Bluetooth modem at port COM9

      Bluetooth modem at port COM9

    If you do have a 3G modem bundled with your laptop (and you have the drivers installed), open the Device manager ("Control Panel -> Device Manager"), find the modem in the list, double click to open the "Properties" page, and browse to the "Modem" tab to find the COM port number.

    Laptop 3G modem in Device Manager

    Laptop 3G modem in Device Manager

    Connecting to the Modem

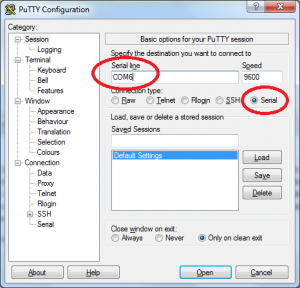
    Next thing - connect to the COM port. In Windows use PuTTY to do it. In Linux use minicom. Don't worry about the settings — the defaults should do.

    PuTTY connection dialog

    PuTTY connection dialog

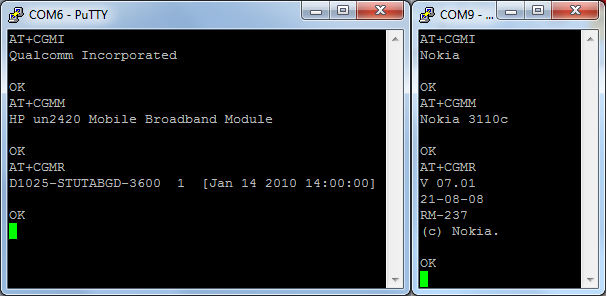
    Once the connection starts, you will get a blank screen with nothing but a cursor. Try typing "AT+CGMI" followed by a <RETURN>. Note that, depending on the settings of your device and the terminal program, you might not see your letters being typed. If so, you will have to reconfigure the terminal (enable "local echo"). But for now, just type the command. You should get the name of the manufacturer in response. You can also get the word "ERROR" instead. This means that your modem is ready to talk to you, but it either does not support the "AT+CGMI" command OR requires you to enter the PIN code first. We'll get to it in a second. If you get no response at all, you must have connected to the wrong COM port.

    Terminal sessions with a Qualcomm (left) and Nokia (right) 3G modems

    Terminal sessions with a Qualcomm (left) and Nokia (right) 3G modems

    You can get more information about the device using the "AT+CGMM", "AT+CGMR", "AT+CGSN" commands. Try those.

    Authentication

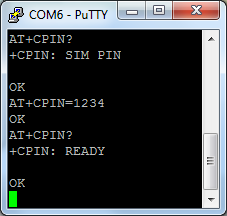
    To do anything useful, you need to authenticate yourself by entering the PIN (if you use your cellphone over bluetooth, you most probably already entered it and no additional authentication is needed). You can check whether you need to enter PIN by using the command "AT+CPIN?" (note the question mark). If the response is "+CPIN: READY", your SIM card is already unlocked. Otherwise the response will probably be "+CPIN: SIM PIN", indicating that a PIN is expected to unlock the card. You enter the pin using the "AT+CPIN=<your pin>" command. Please note, that if you enter incorrect PIN three times, YOUR SIM CARD WILL BE BLOCKED (and you will have to go fetch your PUK code to unblock it), so be careful here.

    Entering the PIN

    Entering the PIN

    Doing Stuff

    Now the fun starts: you can try dialing, sending and receiving messages and do whatever the device lets you do. The (nonexhaustive) list of most interesting commands is available here. Not all of them will be supported by your device, though. For example, I found out that the laptop's 3G modem won't let me dial numbers, whilst this was not a problem for a cellphone connected over bluetooth (try the command "ATD<your number>;" (e.g. "ATD5550010;")). On the other hand, the 3G modem lets me list received messages using the "AT+CMGL" command, while the phone refused to do it.

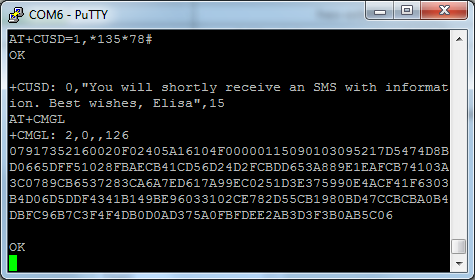
    One useful command to know about is "AT+CUSD", which lets you send USSD messages (those "*1337#" codes) to the mobile service provider. For example, the prepaid SIM card I bought for my computer allows to buy a "daily internet ticket" (unlimited high-speed internet for 12 hours for 1 euro) via the "*135*78#" code. Here's how this can be done via terminal.

    Sending an USSD code and receiving an SMS

    Sending an USSD code and receiving an SMS

    We first send "AT+CUSD=1,*135*78#" command, which is equivalent to dialing "*135*78#" on the phone. The modem immediately shows us the operator's response ("You will shortly receive an SMS with information..."). We then list new SMS messages using the "AT+CMGL" command. There is one message, which is presented to us in the PDU encoding. A short visit to the online PDU decoder lets us decrypt the message - it simply says that the ticket is activated. Nice.

    Sending an SMS

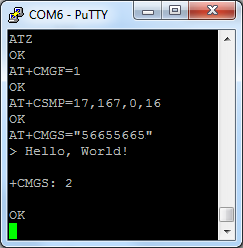
    Finally, here's how you can send a "flash" SMS (i.e. the one which does not get saved at the receiver's phone by default and can thus easily confuse people. Try sending one of those at night - good fun). We start with an ATZ to reset the modem, just in case. Then we set message format to "text mode" using the "AT+CMGF=1" command (the alternative default is the "PDU mode", in which we would have to type SMS messages encoded in PDU). Then we set message parameters using the "AT+CSMP" command (the last 16 is responsible for the message being 'flash'). Finally, we start sending the message using the "AT+CMGS=<phone number>" command. We finish typing the message using <Ctrl+Z> and off it goes.

    Sending a "Flash" SMS

    Sending a "Flash" SMS

    For more details, refer to this tutorial or the corresponding specifications.

    All in all, it should be fairly easy to make a simple end-user interface for operating the 3G modem, it is strange that there is not much free software available which could provide this functionality. If you find one or decide to make one yourself, tell me.

    Tags: , , , ,

  • Posted by Konstantin 19.06.2010 1 Comment

    The other day I was working on a Python program, which internally used a data structure for holding a set of rules. Each rule specified how some object was created from some other objects through certain procedures. The corresponding set of rules could be represented as a bunch of assignment expressions:

    # Description of the relations between objects
    some_item[1].sub_item = some_proc(other_item[2], "Text", 42)
    some_item[2].sub_item = other_proc(some_item[1], "Text", 1337)
    # ... etc

    I would manually describe the required structure using code like the following (in fact, it was slightly more complicated than that, but I hope you get the point).

    struct = Structure()
    struct.add_relation(['some_item', '[1]', '.sub_item'], 
                     ['some_proc', ['other_item', '[2]'], '"Text"', '42'])
    struct.add_relation(['some_item', '[2]', '.sub_item'],
                     ['other_proc', ['some_item', '[1]'], '"Text"', '1337'])
    now_do_something_with(struct)

    After having specified the required rules I would process them and thus solve my task, the details of which are not important here. What is important, is that all those struct.add_relation lines looked messy, long and ugly, and begged for a more concise syntax.

    One obvious choice would be to write the expressions down as strings and parse them within add_relation using ast.parse:

    struct = Structure()
    struct.add_relation(
      'some_item[1].sub_item = some_proc(other_item[2], "Text", 42)')
    struct.add_relation(
      'some_item[2].sub_item = other_proc(some_item[1], "Text", 1337)')
    now_do_something_with(struct)

    Multiple variations on this idea are possible (for example, the whole description could go in a separate configuration file), but in any case this is not a very "easy" solution.

    What I am going to show you here is that appropriate use of Python's dynamic features makes it possible to have the structure defined using Python code, side-by-side with normal Python code, in the following manner:

    @structure_definition
    def struct():
       some_item[1].sub_item = some_proc(other_item[2], "Text", 42)
       some_item[2].sub_item = other_proc(some_item[1], "Text", 1337)
    
    now_do_something_with(struct)

    This post aims to explain the mechanics behind such a solution.

    Part I: __getattr__ and __setattr__

    The first step is fairly easy. As you should know, Python is fairly flexible in that it allows you to redefine any operator, including attribute access, function invocation and assignments. We can therefore create a class StructureCreator, which does redefine all those operators as needed, and then use it in the following manner:

    s = StructureCreator()
    s.some_item[1].sub_item = s.some_proc(s.other_item[2], "Text", 42)
    s.some_item[2].sub_item = s.other_proc(s.some_item[1], "Text", 1337)

    To see what we need to do to make it work, let us explicitly write out what happens here on line 2. This line is equivalent to the following expression:

    s.__getattr__('some_item')
     .__getitem__(1)
     .__setattr__('sub_item', 
       s.__getattr__('some_proc')
        .__call__(s.__getattr__('other_item').__getitem__(2), "Text", 42)
     )

    This invocation structure neatly corresponds to the parse tree of the original expression and our StructureCreator class should therefore simply collect the information from the invocations, recursively building data structures describing the left- and right-hand sides of the expression. Finally, at the time the assignment operator __setattr__ is invoked, the collected information about the assignment can be saved appropriately. Here is an abridged conceptual example:

    class StructureBuilder:
      def __init__(self, expr=''):
        self.__dict__['__expr__'] = expr
    
      def __str__(self):
        return self.__expr__
      __repr__ = __str__
      
      def __getattr__(self, attrname):
        newname = self.__expr__ + '.' + attrname
        return StructureBuilder(newname)
    
      def __setattr__(self, attrname, val):
        newname = self.__expr__ + '.' + attrname
        print 'Saving: %s = %s' % (newname, str(val))   
    
    s = StructureBuilder()
    s.x = s.y

    It remains to implement __getitem__, __setitem__ and __call__ in a similar manner, and voila, you are all covered in syntax sugar.

    The fact that you will have to prefix all your "custom" expressions with this annoying s. might still bug your aesthetical feelings. If so, follow me to the next step.

    Part II: Hiding the Builder

    In the previous part we figured out how, by using __getattr__ and __setattr__ we can make Python interpret assignments our way. In order for it to work, however, we need to explicitly refer to an object which implements those methods, and write lines like

    s.x = s.y

    Can we somehow "hide" this object and have something analogous to automatic __getattr__ for global scope? Yes we can: Python conveniently provides us with a construction:

    exec [code] in [environment]

    which would execute our code, using the provided dictionary to resolve variables.

    Let us try it. We modify our StructureBuilder to inherit from dict and add the methods __getitem__ and __setitem__ which will happily resolve and assign to arbitrary variable names:

    class StructureBuilder(dict):
      def __init__(self, expr=''):
        self.__dict__['__expr__'] = expr
    
      def __str__(self):
        return self.__expr__
      __repr__ = __str__
      
      def __getattr__(self, attrname):
        newname = self.__expr__ + '.' + attrname
        return StructureBuilder(newname)
    
      def __setattr__(self, attrname, val):
        newname = self.__expr__ + '.' + attrname
        print 'Saving: %s = %s' % (newname, str(val))   
    
      def __getitem__(self, itemname):
        newname = self.__expr__ + '.' + str(itemname)
        return StructureBuilder(newname)
    
      def __setitem__(self, itemname, val):
        newname = self.__expr__ + '.' + str(itemname)
        print 'Saving: %s = %s' % (newname, str(val))
    

    Does it work?

    s = StructureBuilder()
    exec 'x[1].y = z' in s

    It does, but now we are providing Python code in a string, which is not at all sexy. Let us try the following instead:

    def definition():
      x[1].y = z
    
    exec definition.func_code in s

    Bummer. NameError: global name 'z' is not defined.. But why? Isn't that exactly the same as the previous attempt with a string?

    Part III: Lexical Scoping

    There is a difference in how Python compiles code in a string and in a function. To see that, let us take a look at what's inside the compiled snippets for a string

    s = 'x = y'

    and a function

    def f():
      x = y

    To do that let us use Python's bytecode disassembler module dis:

    import dis
    # First snippet (code in a string)
    dis.dis(compile(s, '', 'exec'))
    # Second snippet (code in a function)
    dis.dis(f.func_code)

    Here is the output for two snippets side by side:

    Snippet1 (String)                Snippet2 (Function)
    -------------------------------------------------------
    0 LOAD_NAME      0 (y)           0 LOAD_GLOBAL    0 (y)
    3 STORE_NAME     1 (x)           3 STORE_FAST     0 (x)
    6 LOAD_CONST     0 (None)        6 LOAD_CONST     0 (None)
    9 RETURN_VALUE                   9 RETURN_VALUE 

    Now we see it - the snippet from the string uses the LOAD_NAME and SAVE_NAME commands to access the variables, which neatly proxy the requests to our dictionary, as we want them to.

    The snippet from the function behaves in a different way. Firstly, the variable x is accessed using STORE_FAST, which is a command used for local variables. This command would not use the provided dictionary because the variable x has been determined as local to the function's scope and assigned its own memory location within the function's frame at compilation. Secondly, the variable y is accessed via LOAD_GLOBAL which, in Python's terms, refers to a variable from a surrounding lexical scope, not the dynamic scope we are trying to enforce. In short, this command also does not care about the dictionary that we provided.

    Does it mean that it is impossible to overcome the scoping rules that Python uses when compiling a function? Of course not - all we need is to modify the bytecode, replacing each LOAD_FAST, STORE_FAST, LOAD_GLOBAL and STORE_GLOBAL with LOAD_NAME and STORE_NAME.

    Part IV: Bytecode

    The required modification is well documented here, but let me give you a brief overview.
    The bytecode for a Python function f is stored in its field f.func_code.co_code. It is a sequence of bytes, which is easy to parse into opcodes. Every opcode is one byte long. Opcodes with a byte-value greater or equal than opcode.HAVE_ARGUMENT are followed by a two-byte argument. This does not seem to be well documented, but is easily read out from the code of the dis.dis function, which comes with Python. For completeness' sake, here's how a simple bytecode parser might look like:

    def bytecode(code_obj):
    	import opcode
    	code = code_obj.co_code
    	n = len(code)
    	i = 0
    	while i < n:
    		op = ord(code[i])
    		i += 1
    		oparg = None
    		if op >= opcode.HAVE_ARGUMENT:
    			oparg = ord(code[i]) + ord(code[i+1])*256
    			i += 2
    		yield (op, oparg)
    

    We now need to take the code object of our function, replace the ***_FAST and ***_GLOBAL commands with ***_NAME and create a new code object. Leaving out some details, this goes as follows:

    def as_anonymous_block(func):
      new_bytecode = []
      for (op, arg) in bytecode(func.func_code):
        if (op in [STORE_FAST, LOAD_FAST, STORE_GLOBAL, LOAD_GLOBAL]):
          new_op = LOAD_NAME or STORE_NAME, correspondingly
          new_arg = for ***_FAST we need to modify this value
          new_bytecode.append(new_op, new_arg)
        else:
          new_bytecode.append(op, arg)
      return types.CodeType( ... options, flags ... , new_bytecode)
    

    Once we perform this modification on our function object, we can use exec ... in ... to have our StructureBuilder take control of the assignments within the function:

    def definition():
      x[1].y = z
     
    exec as_anonymous_block(definition) in s
    

    Part V: Putting It All Together

    As I promised in the beginning of this post, it is possible to encapsulate the whole thing into a function annotation @structure_definition and use it as follows:

    @structure_definition
    def struct():
       some_item[1].sub_item = some_proc(other_item[2], "Text", 42)
       some_item[2].sub_item = other_proc(some_item[1], "Text", 1337)
    
    now_do_something_with(struct)

    The last step is therefore creating the @structure_definition annotation, which is rather straightforward. For a given function it processes it using as_anonymous_block, creates a new StructureBuilder object, executes the function's code in the StructureBuilder, and returns the result:

    def structure_definition(f):
      blk = as_anonymous_block(f)
      result = StructureBuilder()
      exec blk in result
      return result
    

    For further details refer to (a slightly more elaborate) example code here.

    To conclude, I should note that in my case I still ended up using the solution from Step I (i.e. the one where "dynamic" variables are prefixed with s.), because it allows to use loop variables and other constructs alongside my structure definitions much more naturally than the second method. Nonetheless, I hope you enjoyed the presented exploration as much as I did.

    Tags: , , , ,

  • Posted by Konstantin 23.10.2009 No Comments

    The Alt+Tab key combination is perhaps one of the most well-known keyboard shortcuts in Windows, with the only competitors for the throne being Ctrl+C and Ctrl+V. And no matter, whether you are used to alt-tabbing for working purposes or simply as a means of efficient undercover procrastination, unless you are a complete novice you probably have this skill at the level of basic instincts.

    Unfortunately, there are cases where the instinct becomes inconvenient. Namely, whenever you use an application that displays multiple documents in separate tabs (like Firefox or Notepad++) or in separate child windows (like R), you are expected to use Ctrl+Tab rather than Alt+Tab to switch among documents. However, most of the time switching among documents is subjectively perceived as nothing essentially different than switching among programs, hence the fact that Alt+Tab won't work normally for that case is highly unintuitive. The typical case with me is that I would accidentally use Alt+Tab attempting to switch between the editor and console in R and unexpectedly find a completely different window in front of me, which is quite annoying.

    Although I am pretty sure I am not the only one to experience this kind of frustration, it is surprising that there does not seem to be any easily available solution to this trivial issue known to google. Thus, considering that the whole problem can be solved to a fair extent by simply translating Alt keypresses into Ctrl in a smart way, I've made a smallish program that does exactly that.

    I'm quite happy with the result and can't help sharing it with you.

    Download: Binary, Source.

    Tags: , , ,

  • Posted by Konstantin 27.09.2008 No Comments
    Python 2.6 is out!

    "Python" by xkcd, abridged version. Full version here.

    Tags: , , ,