• Posted by Konstantin 19.03.2014 1 Comment

    Despite the popularity of Python, I find that many of its best practices are not extremely well-documented. In particular, whenever it comes to starting a new Python project, quite a lot of people would follow whatever the very first Python tutorial taught them (or whatever their IDE creates), and start churning out .py files, perhaps organizing them into subdirectories along the way. This is not a good idea. Eventually they would stumble upon problems like "how do I distribute my code""how do I manage dependencies", "where do I put documentation""how (and when) should I start writing tests for my code", etc. Dealing with those issues "later" is always much more annoying than starting with a proper project layout in the first place.

    Although there is no unique standard for a project layout, there are some established best practices. In particular (and this seems to be not very widely known), one of the easiest ways to create a new Python package (i.e., develop anything in Python that will have to be distributed later), is to make use of the paster or cookiecutter tools. Simply running

    $ paster create <package_name>

    or

    $ cookiecutter https://github.com/audreyr/cookiecutter-pypackage.git

    will ask you some questions and initialize a well-formed setuptools-based package layout for you. A slightly more involved yet still minimalistic starter code is provided by additional paster/cookiecutter templates, such as modern-package-template:

    $ pip install modern-package-template
    $ paster create -t modern_package <package_name>

    Naturally, every developer will tend to customize the setup, by adding the necessary tools. Moreover, the preferred setup evolves with time, as various tools and services come in and out of existence. Ten years ago, buildout or git were not yet around. Five years ago, there was no tox and nose was better than py.test. Services like Travis-CI and Github are even younger yet.

    Although I tend to experiment a lot with my setup, over the recent couple of years I seem to have converged to a fairly stable Python environment, which I decided to share as a reusable template and recommend anyone to make use of it.

    Thus, next time you plan to start a new Python project, try beginning with:

    $ pip install python_boilerplate_template
    $ paster create -t python_boilerplate <project_name>

    or, alternatively,

    $ pip install cookiecutter
    $ cookiecutter https://github.com/konstantint/cookiecutter-python-boilerplate

    More information here (for paster) or here (for cookiecutter). Contributions and constructive criticism welcome via Github.

    Tags: , , , ,

  • Posted by Konstantin 25.02.2013 9 Comments

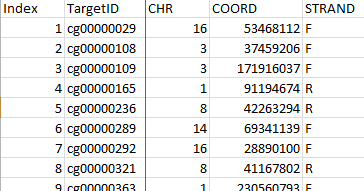
    Most of bioinformatics revolves, in one way or another, around the genome. Even in the largely "non-genomic" areas, such as systems biologyproteomics, or metabolomics, the key players are still genes, proteins, and their regulatory regions, which can be associated with particular points on the genome. Consequently, no matter what kind of data you work with, if you do bioinformatics, you will sooner or later have to deal with genomic coordinates.

    To interpret genomic coordinates you need to know the reference genome version and coordinate conventions used. Does the data file mention those?

    To interpret genomic coordinates you need to know the reference genome version and coordinate conventions used. Does the data file mention those?

    Surprisingly, despite being of such central importance to bioinformatics, the whole genomic coordinate business seems to be in a rather unfriendly state nowadays. Firstly, there are several ways to refer to genomic positions (e.g. 0-based vs 1-based indexing), and for every possible combination of conventions, there is at least one file format that will be using it. Then, of course, you have to deal with several versions of the reference genome, and, to make your life harder yet, most data files will not tell you what genome version should be used to interpret the coordinates stored there. Finally, if you decide that you need to unify the coordinates among your different data files by converting them to the same reference genome version, you will find out that your only tools here are a couple of heavyweight web apps and a command-line UCSC liftOver utility. Should you look for R or Python libraries to script your task, you will discover that those do no smarter than forward all the conversion tasks to that same liftOver.

    I found this is all to be extremely wrong and hacked up a tiny Python tool recently, which will happily convert your coordinates without the need to invoke an external liftOver process. It does not fully replace liftOver (yet?), as it does not convert regions - a task just a bit more tricky than lifting over single points. However it lets you do single-point conversion in the simplest way possible:

    from pyliftover import LiftOver
    lo = LiftOver('hg17', 'hg18')
    lo.convert_coordinate('chr1', 1000000, '-') # 0-based indexing

    As usual, install via: easy_install pyliftover (or pip install pyliftover)

    For more information consult the PyPI page.

    Tags: , , , ,

  • Posted by Konstantin 25.02.2013 No Comments

    If anyone tells you he or she understands probability theory, do not believe them. That person simply does not know enough of it to admit, that probability theory is riddled with paradoxes, where common sense must step aside and wait in silence, or your brain will hurt. Substring statistics is probably among the lesser-known, yet magically unintuitive examples.

    Consider a sequence of random coin flips. Each coin flip is either a "heads" or a "tails", hence the sequence might written down as a sequence of H and T-s: HTHTHHTT...

    It is easy to show that the probability of the sequence to begin with, say, HHH is equal to P(HHH) = 1/8th, as is the case with any other three-letter combination: P(HHT) = P(THH) = P(THT) = 1/8, etc. Moreover, by symmetry, the probability of seeing a particular three-letter combination at any fixed position in the sequence is still always 1/8-th. All three-letter substrings seem to be equivalent here.

    But let us now play a game, where we throw a coin until we see a particular three-letter combination. To be more specific, let us wait until either HHT or HHH comes up. Suppose I win in the first case and you win in the second one. Obviously, the game first proceeds until two heads are flipped. Then, whichever coin flip comes up next determines the winner. Sounds pretty fair, doesn't it? Well, it turns out that, surprisingly, if you count carefully the expected number of coin flips to obtain HHT, it happens to be 8, whereas for HHH it is 14! Ha! Does it mean I have an advantage? Suprisingly again, no. The probability of HHT occuring before HHH in any given sequence is still precisely 0.5 and, as we reasoned initially, the game is still fair.

    We can, however, construct even more curious situations with four-letter combinations. Suppose I bet on HTHT and you bet on THTT.  The expected number of coin flips to obtain my combination can be computed to be 20. The expected number of flips to get your combination is smaller: 18 flips. However, it is still more probable (64%) that my combination will happen before yours!

    If this is not amusing enough, suppose that four of us are playing such a game. Player A bets on the string THH, Player B bets on HHT, player C on HTT and player D on TTH. It turns out that A's combination will occur earlier than B's with probability 75%. B's combination, however, wins over C's with probability 66.7%. C's combination, though, wins over D's with probability 75%. And, to close the loop, D wins over A with probability 66.7%! This is just like the nontransitive dice.

    Hopefully, you are amazed enough at this point to require an explanation for how this all might happen. Let me leave it to you as a small puzzle:

    • Explain in simple terms, how can it happen so that the expected time to first occurrence of otherwise equiprobable substrings may be different?
    • Explain in simple terms, how can it be so that one substring has higher than 50% chance of occuring earlier than some other substring.
    • Finally, explain why the two effects above are not strictly related to each other.

    PS: The theory used to compute actual probabilities and expected times to occurrence of a substring is elegant yet somewhat involved. For the practically-minded, here is the code to check the calculations.

    Tags: , , , ,

  • Posted by Konstantin 13.10.2012 38 Comments

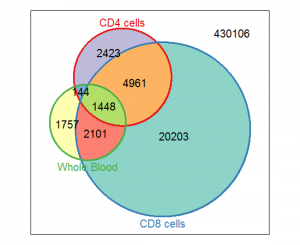
    I have recently discovered that simple Venn diagrams are surprisingly popular in bioinformatics. So popular they are, in fact, that there are several bioinformatics research papers devoted solely to their use. And those are highly accessed papers, let me add! Yet, despite this wild popularity, tools that let you render a decent Venn diagram programmatically seem to be rather scarce.

    Vennerable plot

    Vennerable plot

    If you google a bit, you will find a bunch of on-line tools of varying degrees of quality and ability (1, 2, 3, 4, 5, 6, 7, 8, 9,...), a Java-based tool,  a Perl library, a couple of Python scripts (1, 2), some R libraries (1, 2, 3, 4, 5), and lots of forum discussions. Seems to be plenty, doesn't it? Well, it turns out that if you want your diagram to be area-weighted (i.e. the regions of the diagram should be roughly proportional to the corresponding set sizes), 4 of those 18 links won't do. If you want to generate and configure the diagram conveniently from a script, drop another 9. Then, if you want the diagram to look nice, drop 4 more, and all you are left with is the Vennerable R package. Unfortunately, Vennerable plots are still a pain to configure — even adding a plot title seems to be very tricky, not speaking of highlighting and annotating a region on the diagram.

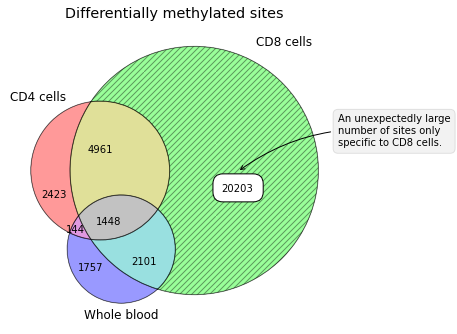
    Having been totally disappointed in the state of the art of contemporary Venn-diagramming tools, I made a small Python package for drawing Venn diagrams that has the necessary flexibility. At least it lets me put plot titles and annotate diagram regions as I fancy.


    Matplotlib-venn plot

    Matplotlib-venn plot


    Package installation goes by the standard method: easy_install matplotlib-venn

    For basic usage examples, consult the PyPI page.

    Tags: , , , ,

  • Posted by Konstantin 19.06.2010 1 Comment

    The other day I was working on a Python program, which internally used a data structure for holding a set of rules. Each rule specified how some object was created from some other objects through certain procedures. The corresponding set of rules could be represented as a bunch of assignment expressions:

    # Description of the relations between objects
    some_item[1].sub_item = some_proc(other_item[2], "Text", 42)
    some_item[2].sub_item = other_proc(some_item[1], "Text", 1337)
    # ... etc

    I would manually describe the required structure using code like the following (in fact, it was slightly more complicated than that, but I hope you get the point).

    struct = Structure()
    struct.add_relation(['some_item', '[1]', '.sub_item'], 
                     ['some_proc', ['other_item', '[2]'], '"Text"', '42'])
    struct.add_relation(['some_item', '[2]', '.sub_item'],
                     ['other_proc', ['some_item', '[1]'], '"Text"', '1337'])
    now_do_something_with(struct)

    After having specified the required rules I would process them and thus solve my task, the details of which are not important here. What is important, is that all those struct.add_relation lines looked messy, long and ugly, and begged for a more concise syntax.

    One obvious choice would be to write the expressions down as strings and parse them within add_relation using ast.parse:

    struct = Structure()
    struct.add_relation(
      'some_item[1].sub_item = some_proc(other_item[2], "Text", 42)')
    struct.add_relation(
      'some_item[2].sub_item = other_proc(some_item[1], "Text", 1337)')
    now_do_something_with(struct)

    Multiple variations on this idea are possible (for example, the whole description could go in a separate configuration file), but in any case this is not a very "easy" solution.

    What I am going to show you here is that appropriate use of Python's dynamic features makes it possible to have the structure defined using Python code, side-by-side with normal Python code, in the following manner:

    @structure_definition
    def struct():
       some_item[1].sub_item = some_proc(other_item[2], "Text", 42)
       some_item[2].sub_item = other_proc(some_item[1], "Text", 1337)
    
    now_do_something_with(struct)

    This post aims to explain the mechanics behind such a solution.

    Part I: __getattr__ and __setattr__

    The first step is fairly easy. As you should know, Python is fairly flexible in that it allows you to redefine any operator, including attribute access, function invocation and assignments. We can therefore create a class StructureCreator, which does redefine all those operators as needed, and then use it in the following manner:

    s = StructureCreator()
    s.some_item[1].sub_item = s.some_proc(s.other_item[2], "Text", 42)
    s.some_item[2].sub_item = s.other_proc(s.some_item[1], "Text", 1337)

    To see what we need to do to make it work, let us explicitly write out what happens here on line 2. This line is equivalent to the following expression:

    s.__getattr__('some_item')
     .__getitem__(1)
     .__setattr__('sub_item', 
       s.__getattr__('some_proc')
        .__call__(s.__getattr__('other_item').__getitem__(2), "Text", 42)
     )

    This invocation structure neatly corresponds to the parse tree of the original expression and our StructureCreator class should therefore simply collect the information from the invocations, recursively building data structures describing the left- and right-hand sides of the expression. Finally, at the time the assignment operator __setattr__ is invoked, the collected information about the assignment can be saved appropriately. Here is an abridged conceptual example:

    class StructureBuilder:
      def __init__(self, expr=''):
        self.__dict__['__expr__'] = expr
    
      def __str__(self):
        return self.__expr__
      __repr__ = __str__
      
      def __getattr__(self, attrname):
        newname = self.__expr__ + '.' + attrname
        return StructureBuilder(newname)
    
      def __setattr__(self, attrname, val):
        newname = self.__expr__ + '.' + attrname
        print 'Saving: %s = %s' % (newname, str(val))   
    
    s = StructureBuilder()
    s.x = s.y

    It remains to implement __getitem__, __setitem__ and __call__ in a similar manner, and voila, you are all covered in syntax sugar.

    The fact that you will have to prefix all your "custom" expressions with this annoying s. might still bug your aesthetical feelings. If so, follow me to the next step.

    Part II: Hiding the Builder

    In the previous part we figured out how, by using __getattr__ and __setattr__ we can make Python interpret assignments our way. In order for it to work, however, we need to explicitly refer to an object which implements those methods, and write lines like

    s.x = s.y

    Can we somehow "hide" this object and have something analogous to automatic __getattr__ for global scope? Yes we can: Python conveniently provides us with a construction:

    exec [code] in [environment]

    which would execute our code, using the provided dictionary to resolve variables.

    Let us try it. We modify our StructureBuilder to inherit from dict and add the methods __getitem__ and __setitem__ which will happily resolve and assign to arbitrary variable names:

    class StructureBuilder(dict):
      def __init__(self, expr=''):
        self.__dict__['__expr__'] = expr
    
      def __str__(self):
        return self.__expr__
      __repr__ = __str__
      
      def __getattr__(self, attrname):
        newname = self.__expr__ + '.' + attrname
        return StructureBuilder(newname)
    
      def __setattr__(self, attrname, val):
        newname = self.__expr__ + '.' + attrname
        print 'Saving: %s = %s' % (newname, str(val))   
    
      def __getitem__(self, itemname):
        newname = self.__expr__ + '.' + str(itemname)
        return StructureBuilder(newname)
    
      def __setitem__(self, itemname, val):
        newname = self.__expr__ + '.' + str(itemname)
        print 'Saving: %s = %s' % (newname, str(val))
    

    Does it work?

    s = StructureBuilder()
    exec 'x[1].y = z' in s

    It does, but now we are providing Python code in a string, which is not at all sexy. Let us try the following instead:

    def definition():
      x[1].y = z
    
    exec definition.func_code in s

    Bummer. NameError: global name 'z' is not defined.. But why? Isn't that exactly the same as the previous attempt with a string?

    Part III: Lexical Scoping

    There is a difference in how Python compiles code in a string and in a function. To see that, let us take a look at what's inside the compiled snippets for a string

    s = 'x = y'

    and a function

    def f():
      x = y

    To do that let us use Python's bytecode disassembler module dis:

    import dis
    # First snippet (code in a string)
    dis.dis(compile(s, '', 'exec'))
    # Second snippet (code in a function)
    dis.dis(f.func_code)

    Here is the output for two snippets side by side:

    Snippet1 (String)                Snippet2 (Function)
    -------------------------------------------------------
    0 LOAD_NAME      0 (y)           0 LOAD_GLOBAL    0 (y)
    3 STORE_NAME     1 (x)           3 STORE_FAST     0 (x)
    6 LOAD_CONST     0 (None)        6 LOAD_CONST     0 (None)
    9 RETURN_VALUE                   9 RETURN_VALUE 

    Now we see it - the snippet from the string uses the LOAD_NAME and SAVE_NAME commands to access the variables, which neatly proxy the requests to our dictionary, as we want them to.

    The snippet from the function behaves in a different way. Firstly, the variable x is accessed using STORE_FAST, which is a command used for local variables. This command would not use the provided dictionary because the variable x has been determined as local to the function's scope and assigned its own memory location within the function's frame at compilation. Secondly, the variable y is accessed via LOAD_GLOBAL which, in Python's terms, refers to a variable from a surrounding lexical scope, not the dynamic scope we are trying to enforce. In short, this command also does not care about the dictionary that we provided.

    Does it mean that it is impossible to overcome the scoping rules that Python uses when compiling a function? Of course not - all we need is to modify the bytecode, replacing each LOAD_FAST, STORE_FAST, LOAD_GLOBAL and STORE_GLOBAL with LOAD_NAME and STORE_NAME.

    Part IV: Bytecode

    The required modification is well documented here, but let me give you a brief overview.
    The bytecode for a Python function f is stored in its field f.func_code.co_code. It is a sequence of bytes, which is easy to parse into opcodes. Every opcode is one byte long. Opcodes with a byte-value greater or equal than opcode.HAVE_ARGUMENT are followed by a two-byte argument. This does not seem to be well documented, but is easily read out from the code of the dis.dis function, which comes with Python. For completeness' sake, here's how a simple bytecode parser might look like:

    def bytecode(code_obj):
    	import opcode
    	code = code_obj.co_code
    	n = len(code)
    	i = 0
    	while i < n:
    		op = ord(code[i])
    		i += 1
    		oparg = None
    		if op >= opcode.HAVE_ARGUMENT:
    			oparg = ord(code[i]) + ord(code[i+1])*256
    			i += 2
    		yield (op, oparg)
    

    We now need to take the code object of our function, replace the ***_FAST and ***_GLOBAL commands with ***_NAME and create a new code object. Leaving out some details, this goes as follows:

    def as_anonymous_block(func):
      new_bytecode = []
      for (op, arg) in bytecode(func.func_code):
        if (op in [STORE_FAST, LOAD_FAST, STORE_GLOBAL, LOAD_GLOBAL]):
          new_op = LOAD_NAME or STORE_NAME, correspondingly
          new_arg = for ***_FAST we need to modify this value
          new_bytecode.append(new_op, new_arg)
        else:
          new_bytecode.append(op, arg)
      return types.CodeType( ... options, flags ... , new_bytecode)
    

    Once we perform this modification on our function object, we can use exec ... in ... to have our StructureBuilder take control of the assignments within the function:

    def definition():
      x[1].y = z
     
    exec as_anonymous_block(definition) in s
    

    Part V: Putting It All Together

    As I promised in the beginning of this post, it is possible to encapsulate the whole thing into a function annotation @structure_definition and use it as follows:

    @structure_definition
    def struct():
       some_item[1].sub_item = some_proc(other_item[2], "Text", 42)
       some_item[2].sub_item = other_proc(some_item[1], "Text", 1337)
    
    now_do_something_with(struct)

    The last step is therefore creating the @structure_definition annotation, which is rather straightforward. For a given function it processes it using as_anonymous_block, creates a new StructureBuilder object, executes the function's code in the StructureBuilder, and returns the result:

    def structure_definition(f):
      blk = as_anonymous_block(f)
      result = StructureBuilder()
      exec blk in result
      return result
    

    For further details refer to (a slightly more elaborate) example code here.

    To conclude, I should note that in my case I still ended up using the solution from Step I (i.e. the one where "dynamic" variables are prefixed with s.), because it allows to use loop variables and other constructs alongside my structure definitions much more naturally than the second method. Nonetheless, I hope you enjoyed the presented exploration as much as I did.
    Tags: , , , ,

  • Posted by Swen 27.11.2008 4 Comments

    Note: This is again a post for sharing personal computer-taming experiences, that aims to help others who might stumble upon simialr problems. Also note, that this is a guest posting kindly presented by Swen Laur.

    Python

    We as dumb users are often hurting ourselves through ignorance. One of many such traps is Python install on Mac OS X Leopard. First, for most users a new install is completely unnecessary, since Leopard comes with pre-installed Python. However, as top Google hits kindly suggest to install MacPython, we as ignorant users follow the advice. As a result, there will be two versions of Python in the computer. Now if we install setup-tools and easy_install, spooky things start to happen — packages that are installed through easy_install are suddenly inaccessible and nothing seems to work properly.

    The explanation behind this phenomenon is simple though a bit technical. Obviously, after having installed MacPython, we have two distributions of Python in our computer:

    • /System/Library/Frameworks/Python.framework/Versions/Current/bin/
    • /Library/Frameworks/Python.framework/Versions/Current/bin/

    which are accessible from the command line through the links in the directories /usr/bin and /usr/local/bin, respectively. On installation, MacPython modifies .bash_login file so that the new path is

    /Library/Frameworks/Python.framework/Versions/Current/bin/;${PATH}
    and thus the command line invocation of python is translated to

    /Library/Frameworks/Python.framework/Versions/Current/bin/python

    which, naturally, corresponds to MacPython.

    As a second clue, note that setup-tools and easy_install packages come with Leopard's Python itself. More precisely, the corresponding command line tool is /usr/bin/easy_install. However, if you install setup-tools for your new MacPython, the corresponding binary will be  /usr/local/bin/easy_install. Now note that in the default configuration, /usr/bin goes before /usr/local/bin in the PATH variable. As a direct consequence, each invocation of easy_install puts packages to Apple Python (into the directory /Library/Python/<version>/site-packages, to be precise), and these packages are naturally not accessible by the MacPython, that you normally execute from a shell. MacPython search the packages from the directory

    /Library/Frameworks/Python.framework/Versions/<version>/lib/python2.5/site-packages.

    As a simple solution, we must change the configuration of easy_install. For that we have to change the configuration  .pydistutils.cfg located at your home directory. There should be the following lines

    [install]
    install_lib=/Library/Frameworks/Python.framework/Versions/Current/lib/python$py_version_short/site-packages/
    install_scripts =/Library/Frameworks/Python.framework/Versions/Current/bin

    The first line specifies where all Python modules should be installed and the second line specifies where all executables should be located (this directory is in the first place in the PATH and thus  MacPyton executables are the first to be executed). After that one should reinstall setuptools and easy_install.During the installation of setuptools, the program might comlain. In this case you should silence it by modifying PYTHONPATH. As a result, easy_install is located 

    /Library/Frameworks/Python.framework/Versions/Current/bin 

    and thus the packages are put into correct directory. As such, we solve the problem with easy_install but are still vulnerable to other easter-eggs coming from the fact that we do not use the Apple distribution of Python. In particular, you cannot do any user-interface related programming, since the corresponding PyObjC module is missing from non-Apple Python distributions.

    Another, more complex solution is to remove MacPython cleanly. The latter is not an easy thing to do, since package management of open-source tools is more than unsatisfactory in Mac OS X (in fact, open-source tools are often difficult to install and uninstall under many non-Linux operating systems). The situation is even worse when you have installed some other Apple packages (.mpkg files) to extend basic configuration of MacPython. In the following, we describe how to do a successful uninstall in such cases. This procedure is not for the fainthearted — if you have a time-machine copy of the system state before installing MacPython, then it might be easier to revert to this state.

    The key to successful uninstallation procedure is a basic understanding what is a package and how the Installer.app works. First, note that the package is nothing more than a directory (one can expand the contents by right-clicking the package) with the following structure

    Contents/Archive.bom
    Contents/Info.plist
    Contents/Packages/..
    Contents/PkgInfo
    Contents/Resources

    The file Info.plist provides an xml-description how to install the package. The file Archive.bom contains in semi-binary description of all files that will be copied to various install locations. The directories Packages and Resources contain sub-packages and files to be copied to the system. The installer.app reads Info.plist and Archive.bom to create necessary files and then copies the package without directories Resources to /Library/Receipts. The receipts are in principle enough to do a clean uninstall if the files are not used by other programs. Normal practice for the Apple software requires that all files should be stored in the directory
    /Applications/Installed-Application.app or in some place in /Library if the corresponding piece of software is shared by several applications. Mostly, the corresponding directories are stored in /Library/Frameworks.  The integrity of all files installed under /System during the system updates are not guaranteed and therefore sane persons do not store files there. The latter is not true for open-source software, which often tries to write into directories /usr/local/bin and /usr/bin (extremely dangerous).

    To uninstall packages, we have to first find out, where it was written. The  key IFPkgFlagDefaultLocation or IFPkgRelocatedPath in the Info.plist contains the default or actual installation directory. With the command line tool lsbom we can also see the list of all files and directories that where installed. To be precise, the lsbom gives out relative paths with respect to install directory.

    Now applying this knowledge, we can deduce that MacPython consists of five packages, which create a directory /Library/Frameworks/Python.framework
    and write the following files

    idle
    idle2.5
    pydoc
    pydoc2.5
    python
    python-config
    python2.5
    python2.5-config
    pythonw
    pythonw2.5
    smtpd.py
    smtpd2.5.py

    to the directory /usr/local/bin in addition to /Application/MacPython <>. Hence, if we remove these files, we restore the initial state unless we installed some other packages. In this case the procedure can be more tedious.

    Finally, we should restore the old ~/.bash_login from the file ~/.bash_login.pysave.

    To summarize, uninstallation of packages is more difficult than application-bundles (yet nevertheless, it is not hopeless). But still, I think applications without installers are the way to go.

    Important update: How to install scypy from source code

    Scipy is a nice extension of Python that provides the power of Matlab functions. By some odd reasons the maintainers of scipy package suggest to install non-Apple distribution of Python. In other words, they force you to abandon PyObjC library that is a core graphical library on Mac OS X. Fortunately,  it is still possible to have both by installing scipy package from the source. There are some hiccups in the procedure but in general it is doable

    1. Install unfpack thogether with UFconfig and AMD libraries from the source
      1. Download source files from the url http://www.cise.ufl.edu/research/sparse/umfpack/
      2. Change the configuration file UFconfig according your computer. Flag
         
        UMFPACK_CONFIG = -DNBLAS  

        is a safe though a bit slow choice 

      3. Run make and pray
      4. Copy libumfpack.a  and libamd.a
      5. to /usr/local/lib

      6. Copy all files from Include directories of UMPACK, UFconfig and AMD:
        umfpack*.h
        UFconfig.h
        amd.h
        amd_internal.h
    2. Download and install numpy and scipy packages. You might change the compilation target by by typing the following commandexport MACOSX_DEPLOYMENT_TARGET=10.4in the shell before compiling and installing. The target value 10.5 is not good choice, since it automatically creates compile problems (joys of using freeware). Note that the current tarball scipy-0.7.0b1 is incomplete (joys of using freeware) and thus you have to use svn trunc for that. But otherwise, the installation guide http://www.scipy.org/Installing_SciPy/Mac_OS_X is correct.

    Important update: An update to the update

    Seems that they have now fixed the 10.5 target and you can use the command

    export MACOSX_DEPLOYMENT_TARGET=10.5

    before compiling if you have Leopard

    Tags: , ,

  • Posted by Konstantin 27.09.2008 No Comments
    Python 2.6 is out!

    "Python" by xkcd, abridged version. Full version here.

    Tags: , , ,