• Posted by Konstantin 27.07.2016 3 Comments

    While writing the previous post I was thinking of coming up with a small fun illustration for Aframe. I first heard about AFrame at the recent European Innovation Academy - a team-project-based entrepreneurship summer school. The team called MemVee was aiming to develop an AFrame-based site which would allow students to design and view interactive "Memory Palaces" - three-dimensional spaces with various objects related to their current study topics, organized in a way that simplifies remembering things for visual learners. Although I have never viewed a "Memory Palace" as something beyond a fantastic concept from a Sherlock Holmes TV episode, I am a visual learner myself and understand the importance of such illustrations. In fact, I try to use and preach graphical references in my teaching practice whenever I find the time and opportunity:

    • In this lecture the concept of a desk is used as a visual metaphor of "structuring the information" as well as to provide an outline to the talk.
    • Here and here an imaginary geographical map is used in a similar context.
    • For the computer graphics course I had to develop some "slides" as small OpenGL apps for visualizing the concepts during the lecture. This has been later taken to extreme heights in the practical materials designed by Raimond-Hendrik, who went on to give this course (alongside with a seminar) in the following years. Unfortunately the materials are closed for non-participants (yet I still hope they will be opened some day, do you read this, Raimond?), but the point is that every single notion has a tiny WebGL applet made to illustrate it interactively.
    • Once I tried to make a short talk about computer graphics, where the slides would be positioned on the walls of a 3D maze, so that to show them I'd have to "walk through the maze", like in a tiny first-person shooter game. Although this kind of visualization was not at all useful as a learning aid (as it did not structure anything at all), it none the less looked cool and was very well appreciated by the younger audience of the talk, to whom it was aimed at.

    I have lost the sources of that last presentation to a computer error and decided to recreate a similar "maze with slides" with AFrame. The night was long and I got sucked into the process to the point of making an automated tool. You upload your slides, and it generates a random maze with your slides hanging on the walls. It is utterly useless, but the domain name "slideamaze.com" was free and I could not resist the pun. [Update from 2018 - the domain expired and the project migrated to slideamaze.ing.ee.]

    Check it out. If you are into programming-related procrastination, try saving the "mazes" generated by the tool on your computer and editing the A-frame code to, say, add monsters or other fun educational tools into the maze.

    Tags: , , , , , ,

  • Posted by Konstantin 21.04.2015 No Comments
    "Hello world" in Flask

    "Hello world" in Flask

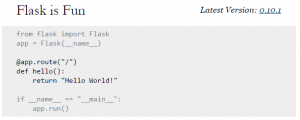
    Over the recent years I happen to have made several small personal projects using Python's Flask web framework. The framework is designed to provide a very minimalistic "bottom-up" approach. It feels slightly less cluttered and imposing than some of the popular alternatives, thus fitting nicely for the projects a single person might typically want to hack up in a spare weekend. Minimalism of Flask does not mean it is somehow limited or unsuitable for larger projects - perhaps on the contrary, small size of the framework means there are fewer restrictions on what and how you can do with it.

    What a small framework needs to be applied comfortably beyond its 6-line "Hello-World" use case, however, is a decent starter project template that would include some of the most common bells and whistles. And indeed, there happen to be several such templates available. I used parts of them over time in my own projects, however I always ended redoing/rewriting/renaming bits and pieces to fit my personal aesthetic needs. Eventually I got tired of renaming and packaged a Flask application template in the way I consistently prefer to use it. I am not sure whether it is objectively better or worse than the alternatives. None the less, if at some point you decide to give Flask a try, let me suggest you try this template of mine as your point of origin.

    Tags: , , , , ,

  • Posted by Konstantin 05.04.2015 4 Comments

    When it comes to data analysis, there are hundreds of exciting approaches: simple summary statistics and hypothesis tests, various clustering methods, linear and nonlinear regression or classification techniques, neural networks of various types and depths, decision rules and frequent itemsets, feature extractors and dimension reductors, ensemble methods, bayesian approaches and graphical models, logic-based approaches and fuzzy stuff, ant colonies, genetic algorithms and other optimization methods, monte-carlo algorithms, sampling and density estimation, logic-based and graph methods. Don't even get me started on the numerous visualization techniques.

    This sheer number of options is, however, both a blessing and a curse at the same time. In many practical situations just having those methods at your disposal may pose more problems than solutions. First you need to pick one of the approaches that might possibly fit your purpose. Then you will try to adapt it appropriately, spend several iterations torturing the data only to obtain very dubious first results, come to the conclusion that most probably you are doing something wrong, reconvince yourself that you need to try harder in that direction, spend some more iterations testing various parameter settings. Nothing works as you want it to, so you start everything from scratch with another method to find yourself obtaining new, even more dubious results, torturing the data even further, getting tired of that and finally settling on something "intermediately decent", which "probably makes sense", although you are not so sure any more and feel frustrated.

    I guess life of a statistician was probably way simpler back in the days when you could run a couple of t-tests, or an F-test from a linear regression and call it a day. In fact, it seems that many experimental (e.g. wetlab) scientists still live in that kind of world, when it comes to analyzing their experimental results. The world of T-tests is cozy and safe. They don't get you frustrated. Unfortunately, t-tests can feel ad-hockish, because they force you to believe that something "is normally distributed". Also, in practice, they are mainly used to confirm the obvious rather than discover something new from the data. A simple scatterplot will most often be better than a t-test as an analysis method. Hence, I am not a big fan of T-tests. However, I do have my own favourite statistical method, which always feels cozy and safe, and never gets me frustrated. I tend to apply it whenever I see a chance. It is the Fisher exact test in the particular context of feature selection.

    My appreciation of it stems from my background in bioinformatics and some experience with motif detection in particular. Suppose you have measured the DNA sequences for a bunch of genes. What can you do to learn something new about the sequence structure from that data? One of your best bets is to first group your sequences according to some known criteria. Suppose you know from previous experiments that some of the genes are cancer-related whereas others are not. As soon as you have specified those groups, you can start making observations like the following: "It seems that 10 out of my 20 cancer-related genes have the subsequence GATGAG in their DNA code. The same sequence is present in only 5 out of 100 non-cancer-related ones. How probable would it be to obtain similar counts of GATGAG, if the two groups were picked randomly?" If the probability to get those counts at random is very low, then obviously there is something fishy about GATGAG and cancer - perhaps they are related. To compute this probability you will need to use the hypergeometric distribution, and the resulting test (i.e. the question "how probable is this situation in a random split?") is known as the Fishers' exact test.

    This simple logic (with a small addition of a multiple testing correction on top) has worked wonders for finding actually important short sequences on the DNA. Of course it is not limited to sequence search. One of our research group's most popular web tools uses the same approach to discover functional annotations, that are "significantly overrepresented" in a given group of genes. The same approach can be used to construct decision trees, and in pretty much any other "supervised learning" situation, where you have groups of objects and want to find binary features of those objects, associated with the groups.

    Although in general the Fisher test is just one particular measure of association, it is, as I noted above, rather "cozy and comfortable". It does not force me to make any weird assumptions, there is no "ad-hoc" aspect to it, it is simple to compute and, most importantly, in my experience it nearly always produces "relevant" results.

    Words overrepresented in the speeches of Greece MPs

    Words overrepresented in the speeches of Greece MPs

    A week ago me, Ilya and Alex happened to take part in a small data analysis hackathon, dedicated to the analysis of speech transcripts from the European Parliament. Somewhat analogously to DNA sequences, speeches can be grouped in various ways: you can group them by the speaker who gave them, by country, gender or political party of that speaker, by the month or year when the speech was given or by any combination of such groupings. The obvious "features" of a speech are words, which can be either present or not present in it. Once you view the problem this way the task of finding group-specific words becomes self-evident and the Fisher test is the natural solution to it. We implemented this idea and extracted "country-specific" and "time-specific" words from the speeches (other options were left out due to time constraints). As is usual the case with my favourite method, the obtained results look relevant, informative and, when shown in the form of a word cloud, fun. Check them out.

    The complete source code of the analysis scripts and the visualization application is available on Github.


    Tags: , , , , , , ,

  • Posted by Konstantin 22.01.2015 38 Comments

    Update from year 2017: The tool described in this post DOES NOT WORK with recent versions of Skype. Either these versions stopped saving removed messages altogether, or they are doing it in a novel manner not recognized by the tool.

    In other words - you would only recover "removed" messages if you are running older version of Skype (or these messages were sent at the time you were using that older version).

    Yesterday I happened to attend a discussion about the security and privacy of information stored locally in Skype and Thunderbird profiles. It turns out, if you obtain a person's Skype profile directory, you will be able to log in as him without the need to know the password. In addition, Dominique made a remark that Skype does not really delete the messages that are marked as "removed" in the chat window. I found that curious and decided to take a closer look.

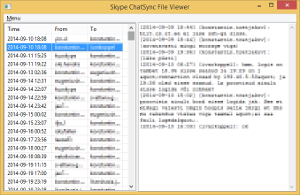
    Indeed, there is a bunch of *.dat files in the chatsync subdirectory of the Skype's profile, which preserve all messages along with all their edits or deletions. Unfortunately, the *.dat files are in some undocumented binary format, and the only tool I found for reading those lacks in features. However, hacking up a small Python parser according to what is known about the format, along with a minimalistic GUI is a single evening's exercise, and I happened to be in the mood for some random coding.

    Skype Chatsync Viewer

    Skype Chatsync Viewer

    Now, if you want to check out what was that message you or your conversation partner wrote before it was edited or deleted, this package will help. If you are not keen on installing Python packages, here is a standalone Windows executable.

    Tags: , , , , , , ,

  • Posted by Konstantin 19.03.2014 1 Comment

    Despite the popularity of Python, I find that many of its best practices are not extremely well-documented. In particular, whenever it comes to starting a new Python project, quite a lot of people would follow whatever the very first Python tutorial taught them (or whatever their IDE creates), and start churning out .py files, perhaps organizing them into subdirectories along the way. This is not a good idea. Eventually they would stumble upon problems like "how do I distribute my code""how do I manage dependencies", "where do I put documentation""how (and when) should I start writing tests for my code", etc. Dealing with those issues "later" is always much more annoying than starting with a proper project layout in the first place.

    Although there is no unique standard for a project layout, there are some established best practices. In particular (and this seems to be not very widely known), one of the easiest ways to create a new Python package (i.e., develop anything in Python that will have to be distributed later), is to make use of the paster or cookiecutter tools. Simply running

    $ paster create <package_name>

    or

    $ cookiecutter https://github.com/audreyr/cookiecutter-pypackage.git

    will ask you some questions and initialize a well-formed setuptools-based package layout for you. A slightly more involved yet still minimalistic starter code is provided by additional paster/cookiecutter templates, such as modern-package-template:

    $ pip install modern-package-template
    $ paster create -t modern_package <package_name>

    Naturally, every developer will tend to customize the setup, by adding the necessary tools. Moreover, the preferred setup evolves with time, as various tools and services come in and out of existence. Ten years ago, buildout or git were not yet around. Five years ago, there was no tox and nose was better than py.test. Services like Travis-CI and Github are even younger yet.

    Although I tend to experiment a lot with my setup, over the recent couple of years I seem to have converged to a fairly stable Python environment, which I decided to share as a reusable template and recommend anyone to make use of it.

    Thus, next time you plan to start a new Python project, try beginning with:

    $ pip install python_boilerplate_template
    $ paster create -t python_boilerplate <project_name>

    or, alternatively,

    $ pip install cookiecutter
    $ cookiecutter https://github.com/konstantint/cookiecutter-python-boilerplate

    More information here (for paster) or here (for cookiecutter). Contributions and constructive criticism welcome via Github.

    Tags: , , , ,

  • Posted by Konstantin 25.02.2013 9 Comments

    Most of bioinformatics revolves, in one way or another, around the genome. Even in the largely "non-genomic" areas, such as systems biologyproteomics, or metabolomics, the key players are still genes, proteins, and their regulatory regions, which can be associated with particular points on the genome. Consequently, no matter what kind of data you work with, if you do bioinformatics, you will sooner or later have to deal with genomic coordinates.

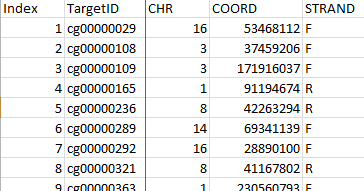
    To interpret genomic coordinates you need to know the reference genome version and coordinate conventions used. Does the data file mention those?

    To interpret genomic coordinates you need to know the reference genome version and coordinate conventions used. Does the data file mention those?

    Surprisingly, despite being of such central importance to bioinformatics, the whole genomic coordinate business seems to be in a rather unfriendly state nowadays. Firstly, there are several ways to refer to genomic positions (e.g. 0-based vs 1-based indexing), and for every possible combination of conventions, there is at least one file format that will be using it. Then, of course, you have to deal with several versions of the reference genome, and, to make your life harder yet, most data files will not tell you what genome version should be used to interpret the coordinates stored there. Finally, if you decide that you need to unify the coordinates among your different data files by converting them to the same reference genome version, you will find out that your only tools here are a couple of heavyweight web apps and a command-line UCSC liftOver utility. Should you look for R or Python libraries to script your task, you will discover that those do no smarter than forward all the conversion tasks to that same liftOver.

    I found this is all to be extremely wrong and hacked up a tiny Python tool recently, which will happily convert your coordinates without the need to invoke an external liftOver process. It does not fully replace liftOver (yet?), as it does not convert regions - a task just a bit more tricky than lifting over single points. However it lets you do single-point conversion in the simplest way possible:

    from pyliftover import LiftOver
    lo = LiftOver('hg17', 'hg18')
    lo.convert_coordinate('chr1', 1000000, '-') # 0-based indexing

    As usual, install via: easy_install pyliftover (or pip install pyliftover)

    For more information consult the PyPI page.

    Tags: , , , ,

  • Posted by Konstantin 13.10.2012 38 Comments

    I have recently discovered that simple Venn diagrams are surprisingly popular in bioinformatics. So popular they are, in fact, that there are several bioinformatics research papers devoted solely to their use. And those are highly accessed papers, let me add! Yet, despite this wild popularity, tools that let you render a decent Venn diagram programmatically seem to be rather scarce.

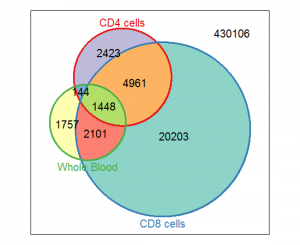
    Vennerable plot

    Vennerable plot

    If you google a bit, you will find a bunch of on-line tools of varying degrees of quality and ability (1, 2, 3, 4, 5, 6, 7, 8, 9,...), a Java-based tool,  a Perl library, a couple of Python scripts (1, 2), some R libraries (1, 2, 3, 4, 5), and lots of forum discussions. Seems to be plenty, doesn't it? Well, it turns out that if you want your diagram to be area-weighted (i.e. the regions of the diagram should be roughly proportional to the corresponding set sizes), 4 of those 18 links won't do. If you want to generate and configure the diagram conveniently from a script, drop another 9. Then, if you want the diagram to look nice, drop 4 more, and all you are left with is the Vennerable R package. Unfortunately, Vennerable plots are still a pain to configure — even adding a plot title seems to be very tricky, not speaking of highlighting and annotating a region on the diagram.

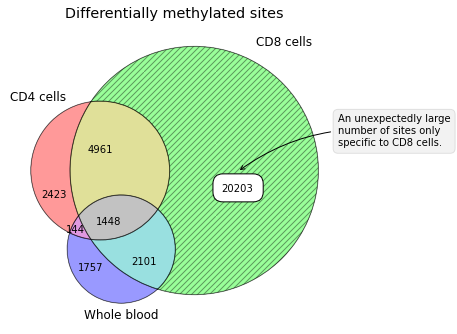
    Having been totally disappointed in the state of the art of contemporary Venn-diagramming tools, I made a small Python package for drawing Venn diagrams that has the necessary flexibility. At least it lets me put plot titles and annotate diagram regions as I fancy.


    Matplotlib-venn plot

    Matplotlib-venn plot


    Package installation goes by the standard method: easy_install matplotlib-venn

    For basic usage examples, consult the PyPI page.

    Tags: , , , ,

  • Posted by Konstantin 19.06.2010 1 Comment

    The other day I was working on a Python program, which internally used a data structure for holding a set of rules. Each rule specified how some object was created from some other objects through certain procedures. The corresponding set of rules could be represented as a bunch of assignment expressions:

    # Description of the relations between objects
    some_item[1].sub_item = some_proc(other_item[2], "Text", 42)
    some_item[2].sub_item = other_proc(some_item[1], "Text", 1337)
    # ... etc

    I would manually describe the required structure using code like the following (in fact, it was slightly more complicated than that, but I hope you get the point).

    struct = Structure()
    struct.add_relation(['some_item', '[1]', '.sub_item'], 
                     ['some_proc', ['other_item', '[2]'], '"Text"', '42'])
    struct.add_relation(['some_item', '[2]', '.sub_item'],
                     ['other_proc', ['some_item', '[1]'], '"Text"', '1337'])
    now_do_something_with(struct)

    After having specified the required rules I would process them and thus solve my task, the details of which are not important here. What is important, is that all those struct.add_relation lines looked messy, long and ugly, and begged for a more concise syntax.

    One obvious choice would be to write the expressions down as strings and parse them within add_relation using ast.parse:

    struct = Structure()
    struct.add_relation(
      'some_item[1].sub_item = some_proc(other_item[2], "Text", 42)')
    struct.add_relation(
      'some_item[2].sub_item = other_proc(some_item[1], "Text", 1337)')
    now_do_something_with(struct)

    Multiple variations on this idea are possible (for example, the whole description could go in a separate configuration file), but in any case this is not a very "easy" solution.

    What I am going to show you here is that appropriate use of Python's dynamic features makes it possible to have the structure defined using Python code, side-by-side with normal Python code, in the following manner:

    @structure_definition
    def struct():
       some_item[1].sub_item = some_proc(other_item[2], "Text", 42)
       some_item[2].sub_item = other_proc(some_item[1], "Text", 1337)
    
    now_do_something_with(struct)

    This post aims to explain the mechanics behind such a solution.

    Part I: __getattr__ and __setattr__

    The first step is fairly easy. As you should know, Python is fairly flexible in that it allows you to redefine any operator, including attribute access, function invocation and assignments. We can therefore create a class StructureCreator, which does redefine all those operators as needed, and then use it in the following manner:

    s = StructureCreator()
    s.some_item[1].sub_item = s.some_proc(s.other_item[2], "Text", 42)
    s.some_item[2].sub_item = s.other_proc(s.some_item[1], "Text", 1337)

    To see what we need to do to make it work, let us explicitly write out what happens here on line 2. This line is equivalent to the following expression:

    s.__getattr__('some_item')
     .__getitem__(1)
     .__setattr__('sub_item', 
       s.__getattr__('some_proc')
        .__call__(s.__getattr__('other_item').__getitem__(2), "Text", 42)
     )

    This invocation structure neatly corresponds to the parse tree of the original expression and our StructureCreator class should therefore simply collect the information from the invocations, recursively building data structures describing the left- and right-hand sides of the expression. Finally, at the time the assignment operator __setattr__ is invoked, the collected information about the assignment can be saved appropriately. Here is an abridged conceptual example:

    class StructureBuilder:
      def __init__(self, expr=''):
        self.__dict__['__expr__'] = expr
    
      def __str__(self):
        return self.__expr__
      __repr__ = __str__
      
      def __getattr__(self, attrname):
        newname = self.__expr__ + '.' + attrname
        return StructureBuilder(newname)
    
      def __setattr__(self, attrname, val):
        newname = self.__expr__ + '.' + attrname
        print 'Saving: %s = %s' % (newname, str(val))   
    
    s = StructureBuilder()
    s.x = s.y

    It remains to implement __getitem__, __setitem__ and __call__ in a similar manner, and voila, you are all covered in syntax sugar.

    The fact that you will have to prefix all your "custom" expressions with this annoying s. might still bug your aesthetical feelings. If so, follow me to the next step.

    Part II: Hiding the Builder

    In the previous part we figured out how, by using __getattr__ and __setattr__ we can make Python interpret assignments our way. In order for it to work, however, we need to explicitly refer to an object which implements those methods, and write lines like

    s.x = s.y

    Can we somehow "hide" this object and have something analogous to automatic __getattr__ for global scope? Yes we can: Python conveniently provides us with a construction:

    exec [code] in [environment]

    which would execute our code, using the provided dictionary to resolve variables.

    Let us try it. We modify our StructureBuilder to inherit from dict and add the methods __getitem__ and __setitem__ which will happily resolve and assign to arbitrary variable names:

    class StructureBuilder(dict):
      def __init__(self, expr=''):
        self.__dict__['__expr__'] = expr
    
      def __str__(self):
        return self.__expr__
      __repr__ = __str__
      
      def __getattr__(self, attrname):
        newname = self.__expr__ + '.' + attrname
        return StructureBuilder(newname)
    
      def __setattr__(self, attrname, val):
        newname = self.__expr__ + '.' + attrname
        print 'Saving: %s = %s' % (newname, str(val))   
    
      def __getitem__(self, itemname):
        newname = self.__expr__ + '.' + str(itemname)
        return StructureBuilder(newname)
    
      def __setitem__(self, itemname, val):
        newname = self.__expr__ + '.' + str(itemname)
        print 'Saving: %s = %s' % (newname, str(val))
    

    Does it work?

    s = StructureBuilder()
    exec 'x[1].y = z' in s

    It does, but now we are providing Python code in a string, which is not at all sexy. Let us try the following instead:

    def definition():
      x[1].y = z
    
    exec definition.func_code in s

    Bummer. NameError: global name 'z' is not defined.. But why? Isn't that exactly the same as the previous attempt with a string?

    Part III: Lexical Scoping

    There is a difference in how Python compiles code in a string and in a function. To see that, let us take a look at what's inside the compiled snippets for a string

    s = 'x = y'

    and a function

    def f():
      x = y

    To do that let us use Python's bytecode disassembler module dis:

    import dis
    # First snippet (code in a string)
    dis.dis(compile(s, '', 'exec'))
    # Second snippet (code in a function)
    dis.dis(f.func_code)

    Here is the output for two snippets side by side:

    Snippet1 (String)                Snippet2 (Function)
    -------------------------------------------------------
    0 LOAD_NAME      0 (y)           0 LOAD_GLOBAL    0 (y)
    3 STORE_NAME     1 (x)           3 STORE_FAST     0 (x)
    6 LOAD_CONST     0 (None)        6 LOAD_CONST     0 (None)
    9 RETURN_VALUE                   9 RETURN_VALUE 

    Now we see it - the snippet from the string uses the LOAD_NAME and SAVE_NAME commands to access the variables, which neatly proxy the requests to our dictionary, as we want them to.

    The snippet from the function behaves in a different way. Firstly, the variable x is accessed using STORE_FAST, which is a command used for local variables. This command would not use the provided dictionary because the variable x has been determined as local to the function's scope and assigned its own memory location within the function's frame at compilation. Secondly, the variable y is accessed via LOAD_GLOBAL which, in Python's terms, refers to a variable from a surrounding lexical scope, not the dynamic scope we are trying to enforce. In short, this command also does not care about the dictionary that we provided.

    Does it mean that it is impossible to overcome the scoping rules that Python uses when compiling a function? Of course not - all we need is to modify the bytecode, replacing each LOAD_FAST, STORE_FAST, LOAD_GLOBAL and STORE_GLOBAL with LOAD_NAME and STORE_NAME.

    Part IV: Bytecode

    The required modification is well documented here, but let me give you a brief overview.
    The bytecode for a Python function f is stored in its field f.func_code.co_code. It is a sequence of bytes, which is easy to parse into opcodes. Every opcode is one byte long. Opcodes with a byte-value greater or equal than opcode.HAVE_ARGUMENT are followed by a two-byte argument. This does not seem to be well documented, but is easily read out from the code of the dis.dis function, which comes with Python. For completeness' sake, here's how a simple bytecode parser might look like:

    def bytecode(code_obj):
    	import opcode
    	code = code_obj.co_code
    	n = len(code)
    	i = 0
    	while i < n:
    		op = ord(code[i])
    		i += 1
    		oparg = None
    		if op >= opcode.HAVE_ARGUMENT:
    			oparg = ord(code[i]) + ord(code[i+1])*256
    			i += 2
    		yield (op, oparg)
    

    We now need to take the code object of our function, replace the ***_FAST and ***_GLOBAL commands with ***_NAME and create a new code object. Leaving out some details, this goes as follows:

    def as_anonymous_block(func):
      new_bytecode = []
      for (op, arg) in bytecode(func.func_code):
        if (op in [STORE_FAST, LOAD_FAST, STORE_GLOBAL, LOAD_GLOBAL]):
          new_op = LOAD_NAME or STORE_NAME, correspondingly
          new_arg = for ***_FAST we need to modify this value
          new_bytecode.append(new_op, new_arg)
        else:
          new_bytecode.append(op, arg)
      return types.CodeType( ... options, flags ... , new_bytecode)
    

    Once we perform this modification on our function object, we can use exec ... in ... to have our StructureBuilder take control of the assignments within the function:

    def definition():
      x[1].y = z
     
    exec as_anonymous_block(definition) in s
    

    Part V: Putting It All Together

    As I promised in the beginning of this post, it is possible to encapsulate the whole thing into a function annotation @structure_definition and use it as follows:

    @structure_definition
    def struct():
       some_item[1].sub_item = some_proc(other_item[2], "Text", 42)
       some_item[2].sub_item = other_proc(some_item[1], "Text", 1337)
    
    now_do_something_with(struct)

    The last step is therefore creating the @structure_definition annotation, which is rather straightforward. For a given function it processes it using as_anonymous_block, creates a new StructureBuilder object, executes the function's code in the StructureBuilder, and returns the result:

    def structure_definition(f):
      blk = as_anonymous_block(f)
      result = StructureBuilder()
      exec blk in result
      return result
    

    For further details refer to (a slightly more elaborate) example code here.

    To conclude, I should note that in my case I still ended up using the solution from Step I (i.e. the one where "dynamic" variables are prefixed with s.), because it allows to use loop variables and other constructs alongside my structure definitions much more naturally than the second method. Nonetheless, I hope you enjoyed the presented exploration as much as I did.

    Tags: , , , ,

  • Posted by Konstantin 23.10.2009 No Comments

    The Alt+Tab key combination is perhaps one of the most well-known keyboard shortcuts in Windows, with the only competitors for the throne being Ctrl+C and Ctrl+V. And no matter, whether you are used to alt-tabbing for working purposes or simply as a means of efficient undercover procrastination, unless you are a complete novice you probably have this skill at the level of basic instincts.

    Unfortunately, there are cases where the instinct becomes inconvenient. Namely, whenever you use an application that displays multiple documents in separate tabs (like Firefox or Notepad++) or in separate child windows (like R), you are expected to use Ctrl+Tab rather than Alt+Tab to switch among documents. However, most of the time switching among documents is subjectively perceived as nothing essentially different than switching among programs, hence the fact that Alt+Tab won't work normally for that case is highly unintuitive. The typical case with me is that I would accidentally use Alt+Tab attempting to switch between the editor and console in R and unexpectedly find a completely different window in front of me, which is quite annoying.

    Although I am pretty sure I am not the only one to experience this kind of frustration, it is surprising that there does not seem to be any easily available solution to this trivial issue known to google. Thus, considering that the whole problem can be solved to a fair extent by simply translating Alt keypresses into Ctrl in a smart way, I've made a smallish program that does exactly that.

    I'm quite happy with the result and can't help sharing it with you.

    Download: Binary, Source.

    Tags: , , ,

  • Posted by Konstantin 19.09.2008 No Comments

    In the yesterday's early-early-morning discussion with Meelis we had an idea that it would be nice to have some kind of an interactive Javascript-based version of the Patmatch-like binding site visualization. I found the idea to be relevant and easy to implement so I couldn't resist hacking up a small example.

     Threshold: 80%


    Tags: , , ,