This article has been cross-posted to Hackster.
What is the best way to learn (or teach) introductory robotics? What could be the "hello world" project in this field, that would be simple for a beginner to get started with, complex enough to be exciting and qualify as a "robot", and deep enough to allow further creative extensions and experiments? Let us try solving this problem logically, step by step!
First things first: what is a "robot"?
Axiom number one: for anything to feel like a robot, it must have some moving parts. Ideally, it could have the freedom move around, and probably the easiest way to achieve that would be to equip it with two wheels. Could concepts other than a two-wheeler qualify as the simplest robot? Perhaps, but let us proceed with this one as a reasonably justified assumption.
The wheels
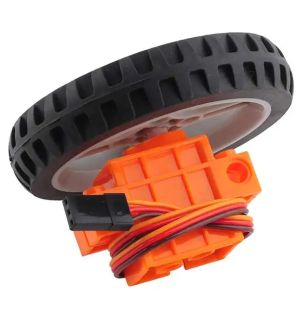
To drive the two upcoming wheels we will need two motors along with all that driver circuitry, ugh! But wait, what about those small continuous rotation servos! They are simple, cheap, and you just need to wire them to a single microcontroller pin. Some of them are even conveniently sold along with with a LEGO-style wheel!
The microcontroller
Rule  number two: it is not a real robot, unless it has a programmable brain, like a microcontroller. But which microcontroller is the best for a beginner in year 2024? Some fifteen years ago the answer would certainly have the "Arduino" keyword in it. Nowadays, I'd say, the magic keyword is "CircuitPython". Programming just cannot get any simpler than plugging it into your computer and editing
 code.py on the newly appeared external drive. No need for "compiling", "flashing" or any of the "install these serial port drivers to fix obscure error messages" user experiences (especially valuable if you need to give a workshop at a school computer class). Moreover, the code to control a wheel looks as straightforward as motor.throttle = 0.5.
OK, 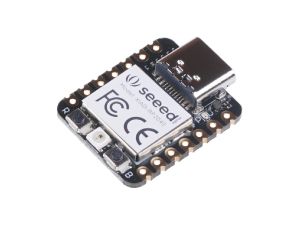 CircuitPython it is, but what specific CircuitPython-compatible microcontroller should we choose? We need something cheap and well-supported by the manufacturer and the community. The Raspberry Pi Pico would be a great match due to its popularity, price and feature set, except it is a bit too bulky (as will become clear below). Check out the Seeedstudio Xiao Series instead. The Xiao RP2040 is built upon the same chip as the Raspberry Pi Pico, is just as cheap, but has a more compact size. Interestingly, as there is a whole series of pin-compatible boards with the same shape, we can later try other models if we do not like this one. Moreover, we are not even locked into a single vendor, as the QT Py series from Adafruit is also sharing the same form factor. How cool is that? (I secretly hope this particular footprint would get more adoption by other manufacturers).
The body
OK, cool. We have our wheels and a microcontroller to steer them. We now need to build the body for our robot and wire things together somehow. What would be the simplest way to achieve that?
Let us start with the wiring, as here we know an obviously correct answer - a breadboard. No simpler manual wiring technology has been invented so far, right? Which breadboard model and shape should we pick? This will depend on how we decide to build the frame for our robot, so let us put this question aside for a moment.
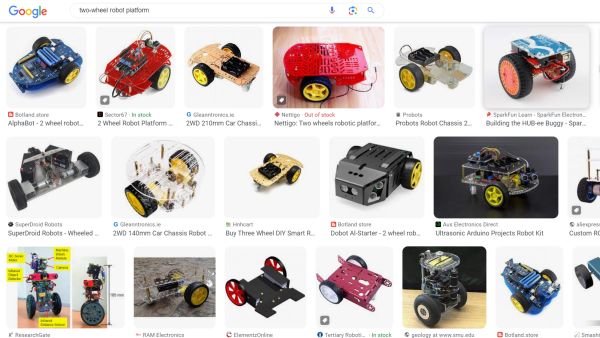
How do we build the frame? The options seem infinite: we can design it in a CAD tool and laser cut it from acrylic sheets, print on a 3D printer, use some profile rails, wooden blocks, LEGO bricks,... just ask Google for some inspiration:
Ugh, this starts to feel too complicated and possibly inaccessible to a normal schoolkid.... But wait, what is it there on the back of our breadboard? Is it sticky tape? Could we just... stick... our motors to it directly and use the breadboard itself as the frame?
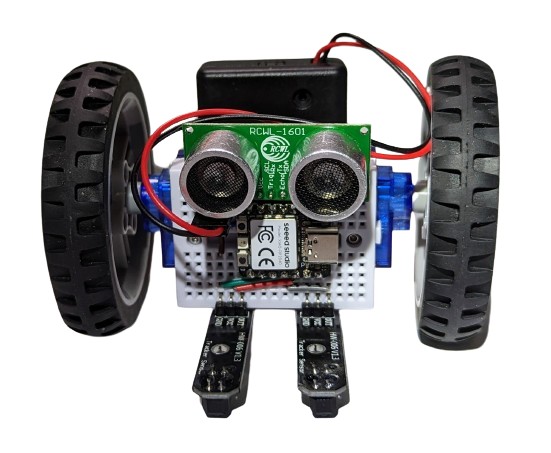
If we now try out a few breadboard models, we will quickly discover that the widespread, "mini-sized", 170-pin breadboard has the perfect size to host our two servos:
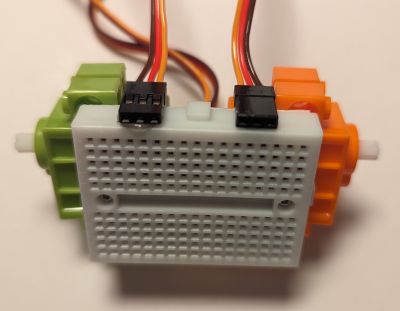
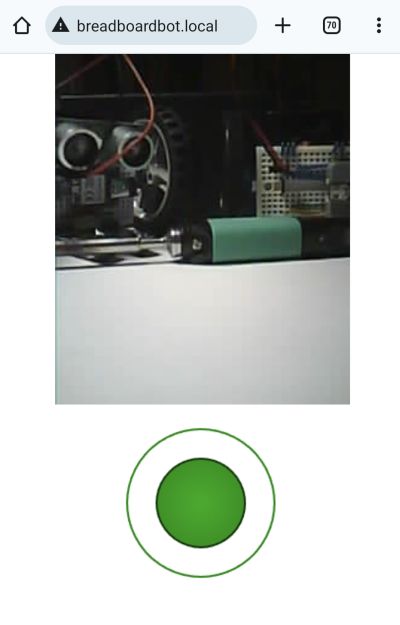
By an extra lucky coincindence, the breadboard even has screw holes in the right places to properly attach the motors! If we now hot glue the servo connectors to the side as shown above, we can wire them comfortably, just as any other components on the breadboard itself. Finally, there is just enough space in the back to pack all the servo wires and stick a 3xAAA battery box, which happens to be enough to power both our servos and the Xiao RP2040:
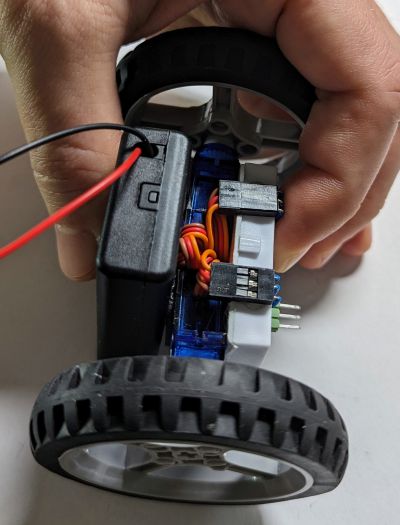
This picture shows the FS90R servos. These work just as well as the GeekServo ones shown in in the picture above.
... and thus, the BreadboardBot is born! Could a breadboard with two motors and a battery stuck to its back qualify as the simplest, lowest-tech ever robot platform? I think it could. Note that the total cost of this whole build, including the microcontroller is under $20 (under $15 if you order at the right discounts from the right places).
But what can it do?
Line following
Rule number 3: it is not a real robot if it is not able to sense the environment and react to it somehow. Hence, we need some sensors, preferably ones that would help us steer the robot (wheels are our only "actuators" so far). What are the simplest steering techniques in introductory robotics? I'd say line following and obstacle avoidance!
Let us do line following first then. Oh, but how do we attach the line tracking sensors, we should have built some complicated frame after all, right? Nope, by a yet another happy design coincidence, we can just plug them right here into our breadboard:

Thanks to the magic of CircuitPython, all it takes now to teach our robot to (even if crudely) follow a line is just three lines of code (boilerplate definitions excluded):
while True:
  servo_left.throttle = 0.1 * line_left.value
  servo_right.throttle = -0.1 * line_right.value
Obstacle avoidance
OK, a line follower implemented with a three-line algorithm is cool, can we do anything else? Sure, look how conveniently the ultrasonic distance sensor fits onto our breadboard:
Add a few more lines of uncomplicated Python code and you get a shy robot that can follow a line but will also happily go roaming around your room, steering away from any walls or obstacles:
Note how you can hear the sonar working in the video (not normally audible).
... and more
There is still enough space on the breadboard to add a button and a buzzer:
.. or splash some color with a Xiao RGB matrix:
.. or plug in an OLED screen to give your BreadboardBot a funny animated face:
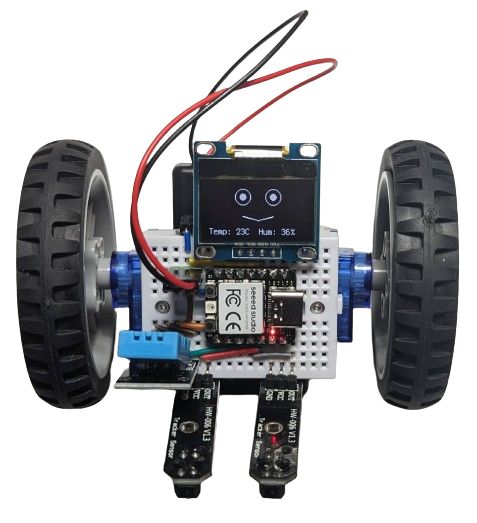 The one on the image above also had the DHT11 sensor plugged into it, so it shows humidity and temperature while it is doing its line following. Why? Because it can!
Tired of programming and just want a remote-controllable toy? Sure, plug in a HC06 bluetooth serial module, program one last time, and go steer the robot yourself with a smartphone:

Other microcontroller boards, BLE, Wifi and FPV
Xiao RP2040 is great, but it has no built-in wireless connectivity! Plug in its ESP32-based cousin Xiao ESP32S3 and you can steer your robot with a Bluetooth gamepad, or via Wifi, by opening a webpage served by the robot itself!
If you have the Xiao ESP32S3 Sense (the version with a microphone and camera), that webpage can even show you the live first-person view feed of the robot's camera (conveniently positioned to look forward):
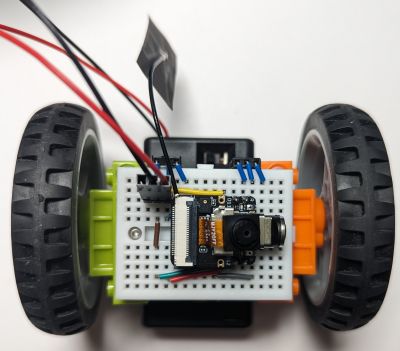
In case you were wondering, the resulting FPV bot is not a very practical solution for spying on your friends, as the microcontroller heats up a lot and consumes the battery way too fast, but it is still a fun toy and an educational project.
Finally, although the Xiao boards fit quite well with all other gadgets on the mini breadboard you are not limited by that choice either and can try plugging in any other appropriately-sized microcontroller board. Here is, for example, a BreadboardBot with an M5Stack Atom Lite running a line-follower program implemented as an ESPHome config (which you can flash over the air!).
Conclusion
The examples above are just the tip of the iceberg. Have any other sensors lying around from those "getting started with Arduino" kits that you did not find sufficiently exciting uses for so far? Maybe plugging them into the BreadboardBot is the chance to shine they were waiting for all this time! Teaching the robot to recognize familiar faces and follow them? Solving a maze? Following voice commands? Self-balancing? Programming coordinated movement of multiple robots? Interfacing the robot with your smart home or one of these fancy AI chatbots? Organizing competitions among multiple BreadboardBots? Vacuuming your desk? The sky (and your free time) is the limit here!
Consider making one and spreading the joy of breadboard robotics!
Detailed build instructions along with wiring diagrams and example code are available on the project's Github page. Contributions are warmly welcome!

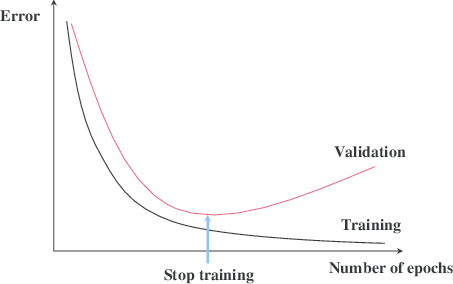
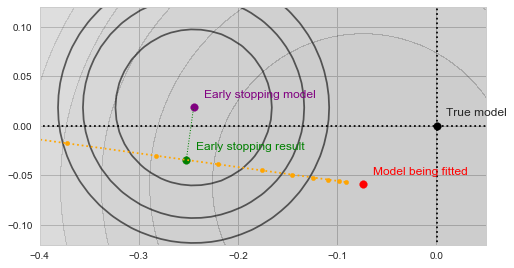
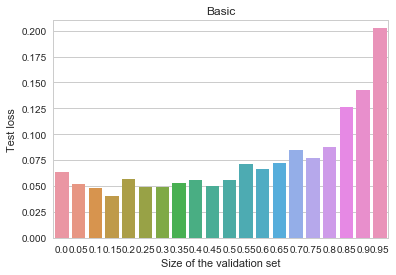
 from a normal distribution with unit covariance and we need to estimate the mean
  of this distribution.
![\[f_\mathrm{train}(\mathrm{w}) := \sum_{i=1}^{50} \Vert \mathbf{x}_i - \mathbf{w}\Vert^2\]](https://fouryears.eu/wp-content/ql-cache/quicklatex.com-4a4ff04b2699f9033f5d09897e4dfc5e_l3.png "Rendered by QuickLaTeX.com")

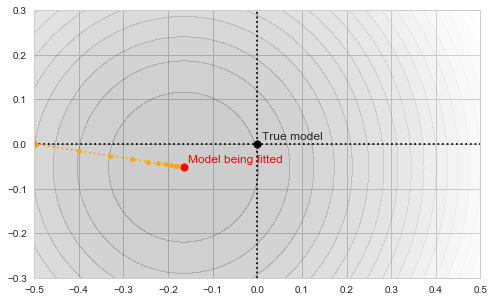
![\[f_\mathrm{fit}(\mathrm{w}) := \sum_{i=1}^{40} \Vert \mathbf{x}_i - \mathbf{w}\Vert^2\]](https://fouryears.eu/wp-content/ql-cache/quicklatex.com-5adb94ca761b724a00c38b830a6bd831_l3.png "Rendered by QuickLaTeX.com")
![\[f_\mathrm{stop}(\mathrm{w}) := \sum_{i=41}^{50} \Vert \mathbf{x}_i - \mathbf{w}\Vert^2.\]](https://fouryears.eu/wp-content/ql-cache/quicklatex.com-8ac10bff72d2e3925e207369119b4537_l3.png "Rendered by QuickLaTeX.com")
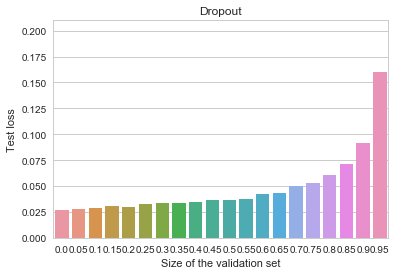
 at each step along the way:
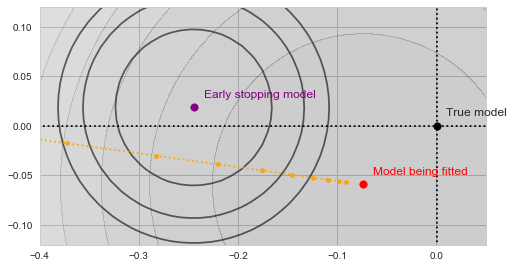
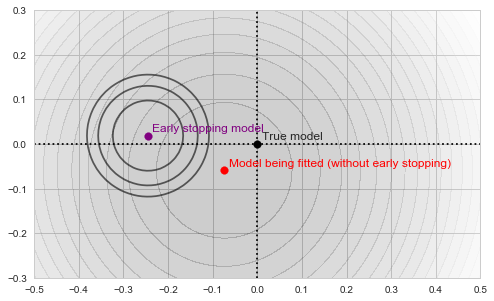
 nor of
  , and are thus inherently a worse representation of the problem altogether.
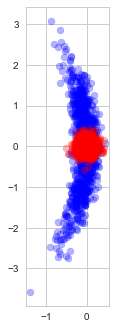
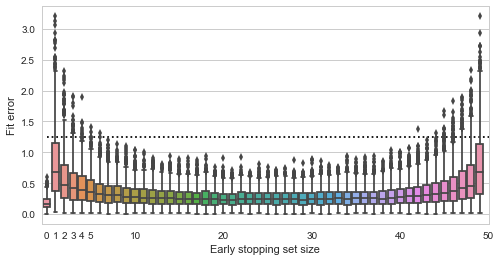
 regularization.
 -penalty added to the objective:
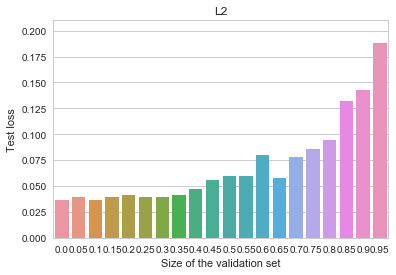


![\[\mathrm{cdist}(\mathbf{x},\mathbf{y}) = 1 - \frac{\mathbf{x}^T\mathbf{y}}{|\mathbf{x}| \; |\mathbf{y}|}\]](https://fouryears.eu/wp-content/ql-cache/quicklatex.com-3e06321f28d55ad27aef17209d2b7b50_l3.png "Rendered by QuickLaTeX.com")